Macvlan路由规则

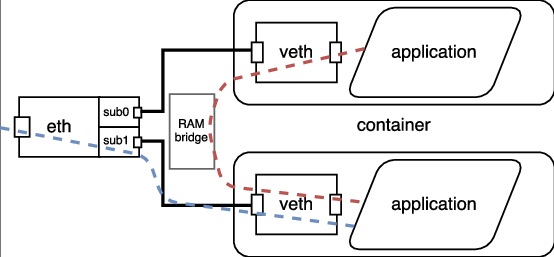
对macvlan 不熟悉的同学,可以先看下这篇macvlan virtual network简介 默认情况下Linux kernel会阻止(drop)宿主机(host eth0)虚拟出来的 macvlan network(bridge mode) 和宿主机host eth0)之间网络数据包。 调试了一段时间后,我们发现了可以通过路由表来绕过这个限制。 具体实施的方法如下: 在host network namesapces下新增 一个macvlan device,然后添加路由规则即可。 通信的两个方向简单解释如下: eth0(host) -> pod(macvlan) 宿主机host eth0 通过break0 设备 和route table的路由规则 可以访问到pod(在macvlan中) shell调试脚本如下: 1 2 3 4 5 6 ip link add break0 link eth0 type macvlan mode bridge # NOTE: if use /24 CIDR will auto add a route rule # (100.75.30.0/24 dev break0 proto kernel scope link src 100.75.30.1) # which we don't need ifconfig break0 100.75.30.7/32 up ip r a 100.75.30.71 dev break0 # 100.75.30.71 is a pod ip for test 因为kuryr是用python配置网络的,所以也提供对应的python脚本如下: ...

March 11, 2019 · datewu

无法创建macvlan设备

最近给客户调试 macvlan network时,遇到了Linux kernel 报错 SIOCSIFFKAGS: Device or resource busy. 无法创建网络device。 结果长时间的debug分析, 发现问题是高并发压测 创建和释放macvlan device的时候,设备的mac address出现了重复。 ps:这个问题只出现在 macvlannetwork 的设备中。 可以用下面的shell脚本来复现macvlan Device or resource busy的错误: 1 2 3 4 5 6 7 8 9 10 11 12 13 14 15 16 17 18 19 20 21 #!/bin/bash function setup { i=$1 ip l a m$i address 00:40:2F:4D:5E:6F link eth0 type macvlan mode bridge ip netns add ns$i ip l set m$i netns ns$i sleep 1 ip netns exec ns$i ifconfig m$i 10.0.0.$((i+1))/24 up echo $? } echo cleaning up ip -all netns d echo creating netsnses for i in `seq $1`; do echo $i.... #setup $i & setup $i done 如果把 macvlan 类型改为 dummy (上面脚本第5行 type macvlan 改为 type dummy) ,即使 MAC address 重复也不会引发kernel 报错。 ...

March 7, 2019 · datewu

pod生命周期事件生成器

PLEG 不熟悉PLEG(Pod Lifecycle Event Generator)的同学,可以先看下这篇文章What is PLEG?。 这篇文章对pleg是什么和常见的unhealthy问题有很详细的介绍。 cni 当k8s的 cni 插件性能较差,node上的pod 数量较多(大于 80)的时候,我们常常会遇到PLEG出错的问题: PLEG is not healthy: pleg was last seen active 6m55.488150776s ago; threshold is 3m0s 调试kuryr cni的时候,发现当openstack neutron服务压力比较大的时候。 cni这边申请和释放 port的时延会相应的增加,导致虚拟机大量堆积无效的netns, 然后就会遇到由kueblet PLEG not healthy引起的docker hang 住问题。 docker 重启 docker 和 kueblet 可以暂时解决PLEG unhealthy。 1 2 3 4 5 systemctl restart docker systemctl restart kubelet # do NOT use `docker rm -vf`, # which will kill running containers docker rm -v `docker ps -qa` 建议同时修改 kubelet 启动参数 –housekeeping-interval=30s ...

February 11, 2019 · datewu

VPC模式

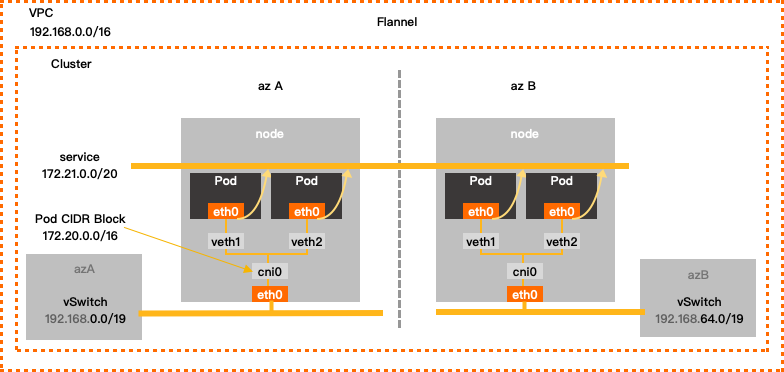
之前写了一篇post 适配腾讯云backend 的文章,从代码的角度简单记录了flannel vpc backend实现过程。 这篇文章是对前面文章的补充,全局鸟瞰描绘了flannel vpc backend网络数据包的流动过程。 总体来看vpc 和 host-gw 模式是很类似的,理解host-gateway模式 对理解vpc 模式很有帮助。 host gw host gateway 模式: host-gw adds route table entries on hosts, so that host know how to traffic container network packets. This works on L2, because it only concerns hosts, switches and containers. switches does not care IP and route, hosts know containers exists, and how to route to them, containers just send and receive data. ...

September 11, 2018 · datewu

收集容器syslog

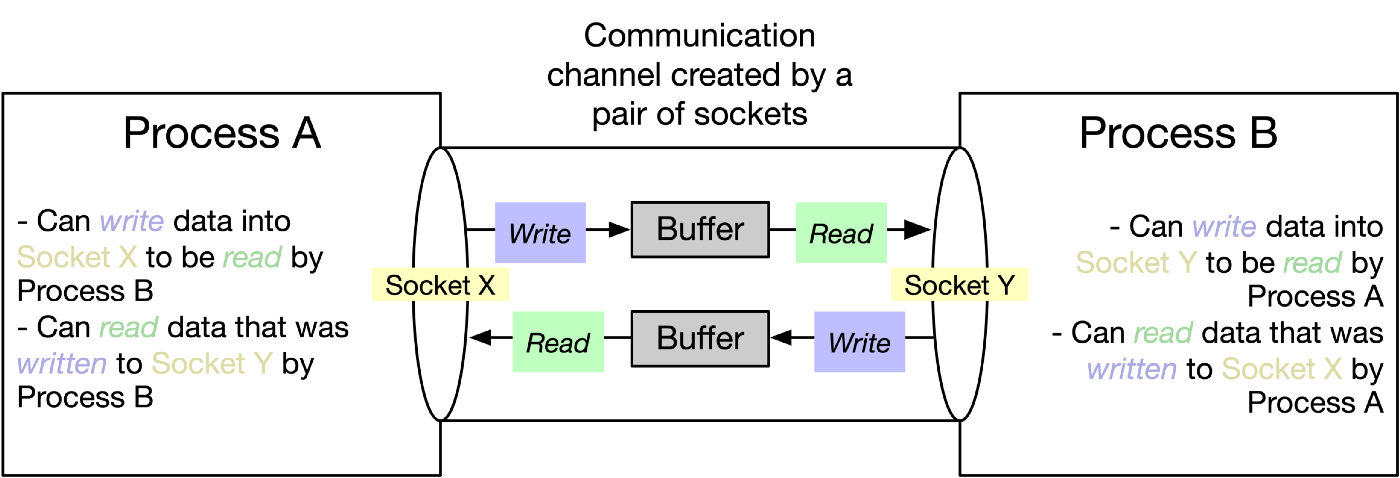
有一个app 跑在pod里面,这个app 默认会输出自己的运行日志到syslogd, 请问如何让host主机上运行的syslogd日志收集器收集到上面app输出的运行日志呢? /dev/log 答案:把 主机的 /dev/log目录挂载到 pod 里面的 /dev/log即可。 Some of these messages need to be brought to a system administrator’s attention immediately. And it may not be just any system administrator – there may be a particular system administrator who deals with a particular kind of message. Other messages just need to be recorded for future reference if there is a problem. Still others may need to have information extracted from them by an automated process that generates monthly reports. ...

September 3, 2018 · datewu

调度到master节点

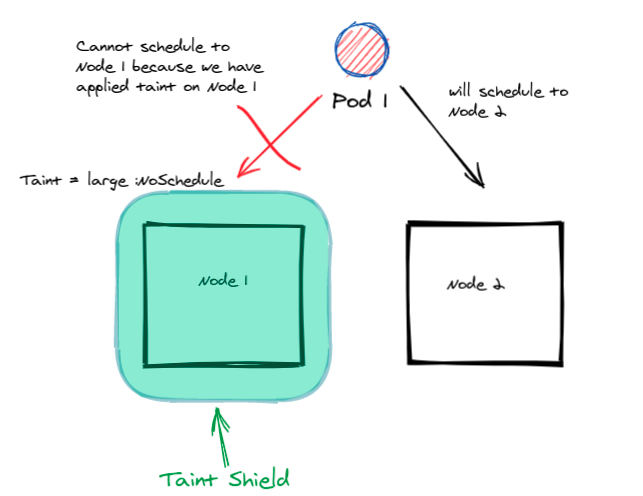
一般来说,kubernetes 的pod是不在master 节点上运行的。 如果要求pod 必须被调度到master 节点上运行,可以修改pod 的 toleration 和 affinity。 toleration和affinity: 在pod加上toleration和affinity配置 yaml 1 2 3 4 5 6 7 8 9 10 11 12 13 spec: tolerations: - key: "node-role.kubernetes.io/master" operator: "Equal" value: "true" effect: "NoSchedule" affinity: nodeAffinity: requiredDuringSchedulingIgnoredDuringExecution: nodeSelectorTerms: - matchExpressions: - key: node-role.kubernetes.io/master operator: Exists go 1 2 3 4 5 6 7 8 9 10 11 12 13 14 15 16 17 18 + Operator: apiv1.TolerationOpExists, + Effect: apiv1.TaintEffectNoSchedule, + }, + }, + Affinity: &apiv1.Affinity{ + NodeAffinity: &apiv1.NodeAffinity{ + RequiredDuringSchedulingIgnoredDuringExecution: &apiv1.NodeSelector{ + NodeSelectorTerms: []apiv1.NodeSelectorTerm{ + apiv1.NodeSelectorTerm{ + MatchExpressions: []apiv1.NodeSelectorRequirement{ + apiv1.NodeSelectorRequirement{ + Key: "node-role.kubernetes.io/master", + Operator: apiv1.NodeSelectorOpExists, + }, + }, + }, + }, + },

August 18, 2018 · datewu

替换k8s所有证书

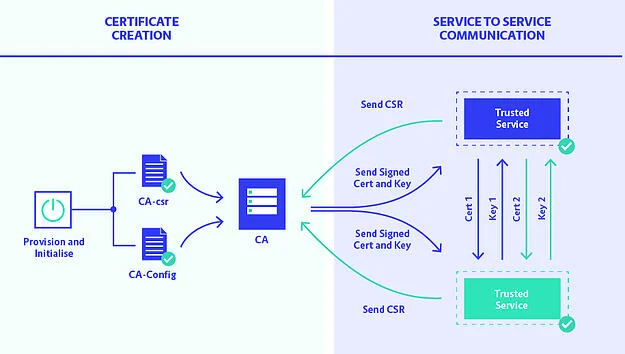
客户需要把kubernetes apiserver/etcd/kubelet/kubectl 等所有的证书有效期修改为100年。 很明显这是一个不合理的需求,不过客户说什么就是什么。 于是经几天的调试有了下面的这个 Makefile批量生成所有(FILES变量)的证书。 如果对makefile的语法不熟悉,可以看看Makefile简介 makefile 1 2 3 4 5 6 7 8 9 10 11 12 13 14 15 16 17 18 19 20 21 22 23 24 25 26 27 28 29 30 31 32 33 34 35 36 37 38 39 40 41 42 43 44 45 46 47 48 49 50 51 52 53 54 55 56 57 58 59 60 61 62 63 64 65 66 67 68 69 70 71 72 73 74 FILES = ca.crt ca.key sa.key sa.pub front-proxy-ca.crt front-proxy-ca.key etcd_ca.crt etcd_ca.key CONFS = admin.conf controller-manager.conf kubelet.conf scheduler.conf SELFS = kubelet.crt.self kubelet.crt.key #KEYs = ca.key front-proxy-ca.key etcd_ca.key sa.key #CAs = ca.crt front-proxy-ca.crt etcd_ca.crt #PUBs = sa.pub ## kubernetes will sign certificate ## automatically, so below ## csr/cert is for test purpose #CSR = apiserver.csr apiserver-kubelet-client.csr CERT_KEYS = apiserver.key apiserver-kubelet-client.key front-proxy-client.key CERTS = apiserver.cert apiserver-kubelet-client.cert front-proxy-client.cert # openssl genrsa -des3 -out rootCA.key 4096 CMD_CREATE_PRIVATE_KEY = openssl genrsa -out $@ 2048 CMD_CREATE_PUBLIC_KEY = openssl rsa -in $< -pubout -out $@ # openssl req -x509 -new -nodes -key rootCA.key -sha256 -days 1024 -out rootCA.crt CMD_CREATE_CA = openssl req -x509 -new -nodes -key $< -sha256 -days 36500 -out $@ -subj '/CN=kubernetes' # openssl req -new -key mydomain.com.key -out mydomain.com.csr CMD_CREATE_CSR = openssl req -new -key $< -out $@ -config $(word 2,$^) # openssl x509 -req -in mydomain.com.csr -CA rootCA.crt -CAkey rootCA.key -CAcreateserial -out mydomain.com.crt -days 500 -sha256 CMD_SIGN_CERT = openssl x509 -req -in $< -CA $(word 2,$^) -CAkey $(word 3,$^) -CAcreateserial -out $@ -days 36500 -sha256 -extfile $(word 4,$^) -extensions my_extensions # generata self sign certificate CMD_CREATE_CERT = openssl req -x509 -new -nodes -key $< -sha256 -days 36500 -out $@ -subj '/CN=nodeXXX@timestamp1531732165' CMD_MSG = @echo generating $@ ... MASTER_IP := 192.168.1.200 ## REMEMBER CHANGE ME .PHONY: all clean check self_sign rename all: ${FILES} ${CONFS} ${CERT_KEYS} ${CERTS} clean: -rm ${FILES} ${CONFS} ${CERT_KEYS} ${CERTS} self_sign: ${SELFS} check: for f in *.cert *.crt; do echo $$f; openssl x509 -noout -dates -in $$f; echo '==='; done rename: for f in *.cert; do echo $$f; mv $$f $${f%.*}.crt; echo '====='; done %.key: ${CMD_MSG} ${CMD_CREATE_PRIVATE_KEY} %.pub: %.key ${CMD_MSG} ${CMD_CREATE_PUBLIC_KEY} %.self: %.key ${CMD_MSG} ${CMD_CREATE_CERT} %.crt: %.key ${CMD_MSG} ${CMD_CREATE_CA} %.csr: %.key %.csr.cnf ${CMD_MSG} ${CMD_CREATE_CSR} %.cert: %.csr ca.crt ca.key %.csr.cnf #%.cert: %.csr front-proxy-ca.crt front-proxy-ca.key %.csr.cnf ${CMD_MSG} ${CMD_SIGN_CERT} %.conf: %.cert %-conf.sh sh $(word 2,$^) ${MASTER_IP} 上面的Makefile还需要对应的csr和 conffiles。 ...

August 10, 2018 · datewu

审计目录

今天调试容器应用的时候发现,app运行一段时间后,容器外挂的一个volumn会偶发性的被删除。 于是需要监控下到底是谁/哪个进程把文件目录给删除了。 google一阵子后,发现可以使用auditd 服务来监控和搜索出都有那些进程操作够目标文件/目录。 整个过程分为3步: 开启 auditd 服务; 使用auditctl 配置 auditd服务; 一段时间之后 使用 ausearch 来查看/搜索审计的日志。 启动监控 开启auditd服务: 1 2 systemctl start auditd ## you may need `mkdir /var/log/audit` 添加监控规则 编辑审计规则: 1 2 3 4 5 6 7 8 ## list existing rules auditctl -l ## clean existing rules auditctl -D ## watch /var/run/yourfolder auditctl -w /var/run/yourfolder -p war -k serachkey auditctl语法 1 2 3 4 5 6 7 8 9 10 11 12 13 14 15 16 17 18 19 20 21 22 23 24 25 26 27 28 29 30 31 32 33 34 35 36 [root@ddeoops ~]# auditctl -h usage: auditctl [options] -a <l,a> Append rule to end of <l>ist with <a>ction -A <l,a> Add rule at beginning of <l>ist with <a>ction -b <backlog> Set max number of outstanding audit buffers allowed Default=64 -c Continue through errors in rules -C f=f Compare collected fields if available: Field name, operator(=,!=), field name -d <l,a> Delete rule from <l>ist with <a>ction l=task,exit,user,exclude a=never,always -D Delete all rules and watches -e [0..2] Set enabled flag -f [0..2] Set failure flag 0=silent 1=printk 2=panic -F f=v Build rule: field name, operator(=,!=,<,>,<=, >=,&,&=) value -h Help -i Ignore errors when reading rules from file -k <key> Set filter key on audit rule -l List rules -m text Send a user-space message -p [r|w|x|a] Set permissions filter on watch r=read, w=write, x=execute, a=attribute -q <mount,subtree> make subtree part of mount point's dir watches -r <rate> Set limit in messages/sec (0=none) -R <file> read rules from file -s Report status -S syscall Build rule: syscall name or number -t Trim directory watches -v Version -w <path> Insert watch at <path> -W <path> Remove watch at <path> --loginuid-immutable Make loginuids unchangeable once set --reset-lost Reset the lost record counter 分析日志 查看/搜索 审计日志: ...
June 20, 2018 · datewu

内核升级

众所周知centos的内核版本选择很保守,很多新内核的新特性,特别是网络和debug方面的特性都没有,所以我们来给centos升级下 kernel吧。 整个升级安装的过程其实挺简单的一共分为4步: 找到repo源; yum安装最新的kernel; 修改grub2启动项; 移除旧的kernel。 安装 elrepo 访问elrepo website查看对应 centos 版本最新的kernel repo源。 然后使用rpm添加kernel源: 1 2 rpm --import https://www.elrepo.org/RPM-GPG-KEY-elrepo.org rpm -Uvh http://www.elrepo.org/elrepo-release-7.0-3.el7.elrepo.noarch.rpm install 安装内核: 1 2 yum --disablerepo="\*" --enablerepo="elrepo-kernel" list available yum --enablerepo=elrepo-kernel install kernel-ml kernel-ml-devel boot 修改grub2启动项,开机使用新的内核: 1 2 3 awk -F\' '$1=="menuentry " {print i++ " : " $2}' /etc/grub2.cfg grub2-set-default 0 init 6 cleanup 删除旧内核 1 2 3 yum install yum-utils package-cleanup --oldkernels --count=1 uname -a 参考 How to Upgrade Kernel on CentOS 7 ...

May 16, 2018 · datewu

配置vscode eslint

离职一段时间了,需要自己写点前端代码。 奈何vim的js插件对jsx的支持不太友好,所以转向vscode写点jsx。 写了些react app代码后,IDE到处飘红色的波浪线〰️〰️〰️,很是恼人。 全局配置react eslint好多了, 记录下配置的过程备查。 配置 基本上是用了airbnb的配置: 具体的步骤很简单,两步就好了: npm安装eslint和要用到plugin; 根据需求配置全局的eslintrc文件 plugin 1 2 3 4 5 6 7 8 9 10 11 12 13 npm install -g jshint npm install -g eslint eslint-config-airbnb-base eslint-plugin-import vi .eslintrc.js ls -alh /usr/local/bin/npm ls /usr/local/lib/node_modules/eslint-config-airbnb-base npm link eslint-config-airbnb-base ls node_modules npm link eslint-plugin-import npm i -g eslint-plugin-react npm i -g eslint-plugin-jsx-a11y npm link eslint-plugin-jsx-a11y eslint-plugin-react vi .eslintrc.js .elinttc.js 1 2 3 4 5 6 7 8 9 10 11 12 13 14 15 16 17 18 19 20 21 // ~/.eslintrc.js module.exports = { parser: "babel-eslint", "plugins": ["react"], "extends": [ "airbnb-base", "eslint:recommended", "plugin:react/recommended", ], "rules": { // "no-unused-vars":0, "no-console": 'off', "max-len": [1,120,2,{ignoreComments: true}] // "prop-types": [2] }, "env": { "browser": true, "node": true, "jasmine": true } }; 参考 react eslint webpack babel ...

April 16, 2018 · datewu