顺丰包裹

快从深圳回老家了,东西丢的差不多了,剩下的东西直接顺丰寄回家。 一共寄了3次顺丰包裹。 前两次的那个工作人员,6块钱一个纸箱,而且按照体积算。 第一次算了69kg:4个包裹,288+21元, 第二次算了51kg: 3个包裹加一个小包裹 216 + 21元。 第三次换了个工作人员算了38kg:两个纸箱和我自己煤气灶的纸箱不算 173 + 21元。 第一次算了4个纸箱 4 * 6 = 24 块,第二次算了3个纸箱 3 * 6 = 18 元, 第三次没有收纸箱的钱。 算下来,寄的越重越省钱。 update 今天(3月31号)寄了最后一次快递,33kg。两个纸箱,一大一小,再加一个帐篷的包。一共 148 +12 = 169元。 纸箱没有收费。

March 20, 2021 · datewu

调试golang测试

调试某个go test程序的时候,需要实现confirm/approve功能: 测试完testCase1之后(或者说是某个断点),用户输入yes,执行下一个case,输入no, 则退出整个测试。 分析 下意识的觉得这个很好实现,调用fmt.Scan应该就OK了。 但是写的时候才发现,go test 会强制重定向os.Stdin = /dev/null忽略所有的 stdin输入, 所以没法使用 fmt.Scan来等待键盘(用户)的输入: 1 2 3 4 5 // fmt.Scan reads from os.Stdin, which is set to /dev/null when testing. // Tests should be automated and self-contained anyway, so you don't want // to read from stdin. // Either use an external file, a bytes.Buffer, or a strings.Reader and // call scan.Fscan if you want to test **the literal** `scan` Function. 解决方案 可以参考事件驱动,使用named pipes来实现confirm/approve功能: ...

October 14, 2020 · datewu

更换brew源

国内网络环境日益恶劣,执行brew update/upgrade花费的时间够我泡好一壶普洱茶。 不过好景不长,谁能想到那么大的普洱茶饼,日积月累一点点的被我喝完了。 哎,怀恋普洱茶呀。 没了普洱茶,我决定换了brew的官方源,给自己节约节约生命。 解决方案 挑挑拣拣一圈之后,我决定使用清华大学开源软件镜像站]的brew源。 按照官网的指引很快就换好了repo,效果很好。 和设置macos DNS servers一样我也整理了个shell脚本: 1 2 3 4 5 6 7 8 9 10 11 12 13 14 15 16 17 18 19 20 21 22 23 24 25 26 27 28 29 30 31 32 33 34 35 36 37 38 39 40 #!/usr/local/bin/bash set_qh() { git -C "$(brew --repo)" remote set-url origin https://mirrors.tuna.tsinghua.edu.cn/git/homebrew/brew.git git -C "$(brew --repo homebrew/core)" remote set-url origin https://mirrors.tuna.tsinghua.edu.cn/git/homebrew/homebrew-core.git git -C "$(brew --repo homebrew/cask)" remote set-url origin https://mirrors.tuna.tsinghua.edu.cn/git/homebrew/homebrew-cask.git brew update } # revocer recover() { git -C "$(brew --repo)" remote set-url origin https://github.com/Homebrew/brew.git git -C "$(brew --repo homebrew/core)" remote set-url origin https://github.com/Homebrew/homebrew-core.git git -C "$(brew --repo homebrew/cask)" remote set-url origin https://github.com/Homebrew/homebrew-cask.git brew update } a=${1-"check"} # default to check if [ $a = "r" ]; then recover fi if [ $a = "set" ]; then set_qh fi if [ $a = "check" ]; then echo "goping to EXPORT HOMEBREW_BOTTLE_DOMAIN" export HOMEBREW_BOTTLE_DOMAIN=https://mirrors.tuna.tsinghua.edu.cn/homebrew-bottles echo $HOMEBREW_BOTTLE_DOMAIN brew config | grep ORIGIN brew update brew upgrade brew cleanup fi echo "" echo $a successed! 上面的bash脚本支持3个参数 check,set和 recover,默认使用 check参数。 ...

August 14, 2020 · datewu

设置dns

众所周知,修改/etc/resolv.conf配置文件可以配置Linux的dns 解析服务器。 1 2 3 4 [root@VM-8-3-centos ~]# cat /etc/resolv.conf # Generated by NetworkManager nameserver 183.60.83.19 nameserver 183.60.82.98 那么苹果系统的dns 解析服务器应该在哪里配置呢,也是配置/etc/resolv.conf文件吗? 1 2 3 4 5 6 7 8 9 10 11 12 13 14 15 16 17 ➜ ~ cat /etc/resolv.conf # macOS Notice # # This file is not consulted for DNS hostname resolution, address # resolution, or the DNS query routing mechanism used by most # processes on this system. # # To view the DNS configuration used by this system, use: # scutil --dns # # SEE ALSO # dns-sd(1), scutil(8) # # This file is automatically generated. # nameserver 127.0.0.1 nameserver 192.168.1.1 故事 因为新冠的爆发,公司下放了VPN权限,可以在家接公司办公网络办公。 ...

June 10, 2020 · datewu

tcl入门

使用了一段时间Expect自动化工具简介里面的expect脚本,发现少了一些功能: 怎么给expect脚本传参数呢? expect怎么调用 bash/sh外部命令呢? expect怎么操作字符串呢? tcl 前面的文章Expect命令里面提到过,expect 使用的是Tcl/tk的语法。 所以 大家Google 一下 tcl tutorial就可以解决上面三个问题了。 tcl argc argc Tcl tutorial Tcl regexp new expect script 结合上面的3篇教程我把上篇文章自动化ssh 登陆的脚本优化如下: 1 2 3 4 5 6 7 8 9 10 11 12 13 14 15 16 17 18 19 20 21 22 23 24 25 26 27 28 29 30 31 32 33 34 35 36 37 38 39 40 41 42 43 44 #!/usr/bin/expect -f # for anyone not familar with expect # should read this awesome article # https://www.pantz.org/software/expect/expect_examples_and_tips.html if { $argc != 1} { puts "must set one argument for server_A host ip" puts "./login.tcl 1.1.2.2" exit 1 } set timeout 15 #set info [gets stdin] set info [exec privateRESTfullAPI2GetPwd -host $argv] set result [regexp {\"([^\"]*)\"[^\"]*\"([^\"]*)\"[^\"]*\"([^\"]*)\"} $info match host pw1 pw2] send_user "going to connected to server_A\n" spawn ssh -q -o StrictHostKeyChecking=no nobody@host expect { timeout { send_user "\ntimeout Failed to get password prompt, is VPN on?\n"; exit 1 } eof { send_user "\nSSH failure for server_A\n"; exit 1 } "*assword:" } send "$pwd1\r" expect { timeout {send_user "\nSSH failure for server_B\n"; exit 1 } "Last login:*" } send "su -\r" expect { eof { send_user "\nSSH failure check your password \n"; exit 1 } "密码" } send "$pw2\r" interact 简单解释上面的脚本: ...

May 19, 2020 · datewu

socat工具

众所周知kubenetest的端口转发功能kubectl port-forward非常实用,可以提高开发人员的debug效率。 其实kubectl port-forward的底层脏活累活都是socat命令在做,kubectl只能算是一个代理商。 socat 端口转发 socat tcp-listen:58812,reuseaddr,fork tcp:localhost:8000把58812端口的流量转发到 8000上。 1 2 3 4 5 6 7 8 9 10 bash-5.1# python3 -m http.server & bash-5.1# socat tcp-listen:58812,reuseaddr,fork tcp:localhost:8000 & bash-5.1# curl -I localhost:58812 HTTP/1.0 200 OK Server: SimpleHTTP/0.6 Python/3.10.3 Date: Thu, 14 Apr 2022 03:19:15 GMT Content-type: text/html; charset=utf-8 Content-Length: 336 从而使得原来无法访问的 localhost:8000端口的服务,现在可以通过*:58812访问到了。 1 2 3 4 5 6 7 bash-5.1# netstat -nlp Active Internet connections (only servers) Proto Recv-Q Send-Q Local Address Foreign Address State PID/Program name tcp 0 0 0.0.0.0:58812 0.0.0.0:* LISTEN 10/socat tcp 0 0 0.0.0.0:8000 0.0.0.0:* LISTEN 31/python3 Active UNIX domain sockets (only servers) Proto RefCnt Flags Type State I-Node PID/Program name Path 其他 1 2 3 4 5 6 7 8 9 10 11 12 13 14 ➜ ~ tldr socat socat Multipurpose relay (SOcket CAT). - Listen to a port, wait for an incoming connection and transfer data to STDIO: socat - TCP-LISTEN:8080,fork - Create a connection to a host and port, transfer data in STDIO to connected host: socat - TCP4:www.example.com:80 - Forward incoming data of a local port to another host and port: socat TCP-LISTEN:80,fork TCP4:www.example.com:80 语法 man 手册 ...

April 14, 2020 · datewu

TCP/IP教程

本文不定期更新 :) 上个礼拜逛Hacker News看到推荐了一份写于1991年介绍TCP/IP协议的文章A TCP/IP Tutorial。 初略的扫了几眼,发现不错,加入了收藏夹。 昨天晚上抽出时间来细读了一遍觉得很有翻译的价值,于是试着翻译一下: Introduction This tutorial contains only one view of the salient points of TCP/IP, and therefore it is the “bare bones” of TCP/IP technology. It omits the history of development and funding, the business case for its use, and its future as compared to ISO OSI. Indeed, a great deal of technical information is also omitted. What remains is a minimum of information that must be understood by the professional working in a TCP/IP environment. These professionals include the systems administrator, the systems programmer, and the network manager. ...

April 13, 2020 · datewu

SSH代理(Agent)

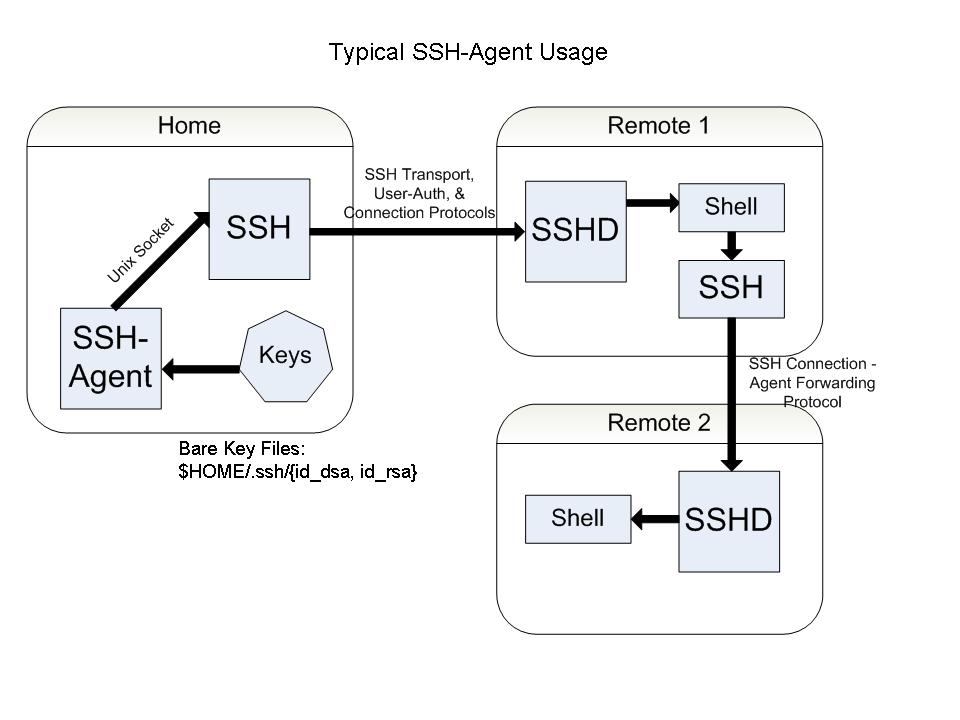
问题 已知本地local可以ssh到server A和B, 问如何从server A ssh到server B,以及如何在server A 和B之间使用scp互传文件 ? 解决方案 配置ssh_config然后使用 ssh-add命令指定使用ssh agent可以很安全和高效的解决上面的两个问题。 配置ssh_config 注意看注释,下面脚本所有的操作和配置都是在 本地local上执行的: 1 2 3 4 5 6 7 8 9 10 11 12 13 14 15 16 17 18 19 20 21 22 23 24 vi .ssh/config ## 修改配置 添加forward agent HOST server-A HostName 1.2.3.4 User root IdentityFile ~/.ssh/serverA ForwardAgent yes # 现在 serverA可以和local本机的agent通信啦 HOST server-B HostName 6.7.8.9 User root IdentityFile ~/.ssh/serverB ForwardAgent yes # 现在 serverB可以和local本机的ssh agent 通信啦 rg Forward /etc/ssh/ssh_config ## 检查全局的forwordagent配置有没有被覆盖 echo "$SSH_AUTH_SOCK" ## 查看本地ssh agent是否在运行 ssh-add -L ## 查看/操作/删除 ssh agent hold的keys ssh-add -K li ssh-add -K ~/.ssh/serverA ## 给agent serverA 密钥,使得serverB 可以“使用” 这个密钥 ssh-add -K ~/.ssh/serverB ## 给agent serverB密钥,使得serverA可以“使用”这个密钥 ssh-add -K ~/.ssh/github ## 给阿根廷 github密钥,使得serverA, serverB都可以ssh github,方便测试 ssh-add -L 验证github 也是在本机local操作,以github作为测试目标: ...

April 12, 2020 · datewu

Expect自动化工具简介

公司服务器使用了两层跳板机,外面的一台我们管它叫 server A, 另外一台 叫它 server B。 虽然我不知道这种双保险给公司带来了多少安全感,但是我知道我的运维效率降低了差不多90%吧 :>。 server A被直接暴露在公网上, 我们不能使用 ssh key 只能使用 password认证ssh。 这还不算完,server A每3小时改一次自己的root密码。 后面的server B跳板机器的自我安全感就强多了,server B可以直接免密使用ssh key登陆所有的内网服务器,而且允许server A免密登陆到自己。 我决得这样两次登录很浪费时间,于是写了个脚本从外网一次性登陆到server B服务器上。 expect 脚本 1 2 3 4 5 6 7 8 9 10 11 12 13 14 15 16 17 18 19 20 21 22 23 24 25 26 27 28 29 30 31 32 33 34 #!/usr/bin/expect -f # for anyone not familar with expect # should read this awesome post # https://www.pantz.org/software/expect/expect_examples_and_tips.html set timeout 15 ### CHANGE pwd every 3h set pwd "mySuperSecretpwd123" set nested_ssh "ssh server_B" ## for debug # log_user 0 # exp_internal 1 send_user "going to connected to server A\n" spawn ssh -q -o StrictHostKeyChecking=no server_A expect { timeout { send_user "\ntimeout Failed to get password prompt, is VPN on?\n"; exit 1 } eof { send_user "\nSSH failure for server A\n"; exit 1 } "*assword:" } send "$pwd\r" expect { timeout {send_user "\nSSH failure for server B\n"; exit 1 } "Last login:*" } send "$nested_ssh\r" interact 基本语法 简单说下基本流程如下: ...

March 19, 2020 · datewu

容器PID

架构部的同事问了我两个问题: 宿主机上有个进程很耗 cpu,怎么判断它是不是某个容器的进程; 如果它是跑在容器里,怎么查到是哪个容器(container id); 解决方案 有两种方法来解决上面两个问题: cgroup 通过查看pid的cgroup是否含有 slice信息来判断是否是容器进程: 主机进程 cgroup 直接运行在宿主机主的进程的cgroup是没有slice信息的: 1 2 3 4 5 6 7 8 9 10 11 12 13 14 15 16 17 18 19 20 21 22 23 24 [root@deoops ~]# cat /proc/1/cgroup 11:perf_event:/ 10:memory:/ 9:devices:/ 8:cpuacct,cpu:/ 7:cpuset:/ 6:hugetlb:/ 5:blkio:/ 4:net_prio,net_cls:/ 3:freezer:/ 2:pids:/ 1:name=systemd:/ [root@deoops ~]# cat /proc/19/cgroup 11:perf_event:/ 10:memory:/ 9:devices:/ 8:cpuacct,cpu:/ 7:cpuset:/ 6:hugetlb:/ 5:blkio:/ 4:net_prio,net_cls:/ 3:freezer:/ 2:pids:/ 1:name=systemd:/ k8s pod进程 cgroup 在宿主机上看跑在容器进程的cgroup是可以看到slice信息的: ...

March 13, 2020 · datewu