准确的分页

昨天同事调试前端页面分页功能时, 发现了一个分页的问题。 问题简要描述如下: 前端选择一些过滤条件(a&&b&&c||d …)向后端请求数据,过一会发现用同样的过滤条件去查询,数据变少了,前端看上去第一页和最后一页是一样的。 初步怀疑是分页出了问题。 这个分页的问题比较麻烦,不能稳定复现,一会出现一会又不出现。 分析了很长一段时间后,发现是后台的定时任务更新了db数据使得很多数据不再符合前面的过滤条件,后端框架返回的总页码数,和data的数量不符。 也就是说后端返回的总页码数是脏/旧数据。 脏数据 查看后端框架代码时候,发现后端查询db的执行了count 和 select 两条query: 1 2 3 4 5 6 select count(*) form table_name where condition_a -- meamwhile other workers update table_a -- A LOT in short time -- or they(the workers) MIGHT lock -- the WHOLE table for READ select * form table_name where condition_a 这就是是造成脏数据的原因。 解决方案 window function 可以用 window function 做到上述两条query的同时查询(其实就是一条查询): 1 2 3 4 5 6 SELECT *, count(*) OVER() AS full_count FROM tbl WHERE -- /* whatever */ ORDER BY col1 LIMIT ? OFFSET ? Common Table Expressions (cte) However, as Dani pointed out, when OFFSET is at least as great as the number of rows returned from the base query, no rows are returned. So we also don’t get full_count. ...

March 2, 2020 · datewu

安装wireguard server

今天在hacker news上看到 wireguard macos client 发布了,决定试用一下。 和所有的vpn安装一样,wireguard的安装也是分两步,一是安装vpn server,二是安装 vpn的client。 安装不分先后,配置先配置vpn server,然后再配置client。 服务端 安装wireguard server 服务器为 RHEL 7.6 (Maipo), 服务端的安装流程: 1 2 3 4 5 6 7 8 9 10 11 12 13 14 15 #!/bin/bash sudo -i [root@deoops ~]# cat /etc/redhat-release Red Hat Enterprise Linux Server release 7.6 (Maipo) [root@deoops ~]# echo "net.ipv4.ip_forward = 1" >> /etc/sysctl.conf [root@deoops ~]# sysctl -p ### install packages [root@deoops ~]# curl -Lo /etc/yum.repos.d/wireguard.repo https://copr.fedorainfracloud.org/coprs/jdoss/wireguard/repo/epel-7/jdoss-wireguard-epel-7.repo [root@deoops ~]# yum install -y epel-release wireguard-dkms wireguard-tools [root@deoops ~]# yum install -y epel-release [root@deoops ~]# rpm -ivh https://dl.fedoraproject.org/pub/epel/epel-release-latest-7.noarch.rpm [root@deoops ~]# yum update -y [root@deoops ~]# yum install -y epel-release wireguard-dkms wireguard-tools [root@deoops ~]# init 6 配置wireguard server 1 2 3 4 5 6 7 8 9 10 11 12 13 14 15 16 17 ### wireguard server conf [root@deoops ~]# cat wg.conf [Interface] ListenPort = 58855 PrivateKey = private_key [Peer] PublicKey = public_key_one #AllowedIPs = 0.0.0.0/0 AllowedIPs = 10.0.0.7/32 [Peer] PublicKey = public_key_two #AllowedIPs = 0.0.0.0/0 AllowedIPs = 10.0.0.9/32 启动服务端wg0 设备 记得加上iptables设置: ...

January 6, 2020 · datewu

挂载硬盘

update: more user friendly 1 2 3 4 5 6 7 8 9 10 11 12 13 14 15 16 17 18 19 20 21 22 23 24 25 26 27 28 29 30 31 32 33 34 35 36 37 38 39 40 41 42 43 44 45 46 47 48 49 50 51 52 53 54 55 56 57 58 59 60 61 62 63 64 #bin/bash mustBeRoot() { if [ "$(id -u)" != "0" ]; then echo "只有root用户才能运行" 1>&2 echo "当前登录用户`whoami`" exit 1 fi } # 数据盘挂载 checkAndMountDataDisk() { echo "选择数据盘/分区 :" fdisk -l | grep /dev | grep G | cut -f 1 -d , echo " " read -p "请输入硬盘/分区 名:/dev/" -r disk_name disk_id=`blkid | grep $disk_name` if [ $? -ne 0 ];then echo "获取硬盘/分区 $disk_name uuid失败,请检查名称是否准确" exit 1 fi disk_path=`echo $disk_id | cut -f 1 -d ':' ` echo "已选择 $disk_path" disk_uuid=`blkid $disk_path | cut -f 2 -d '"' ` disk_info=`lsblk -f $disk_path | grep $disk_uuid ` if [ $? -ne 0 ];then echo "获取硬盘/分区 $disk_path 详细信息失败,请检查名称是否正确" exit 1 fi fs_type=`echo $disk_info | cut -f 2 -d ' '` if [ $fs_type != 'ext4' ];then echo "硬盘文件系统格式不是ext4。" read -p "是否格式化为 ext4? 输入 y 同意格式化" -r format_ext4 if [ $format_ext4 != 'y' ];then echo "未格式化 $disk_path 文件系统格式,退出安装脚本。" exit 1 fi echo "即将格式化 $disk_path 文件系统格式...." mkfs.ext4 $disk_path fi if [ -d "$1" ];then echo "数据盘挂载点/data目录已存在" else echo "创建数据盘挂载点/data目录" mkdir $1 fi mount UUID=$disk_uuid $1 echo "UUID=$disk_uuid $1 ext4 defaults 0 0" >> /etc/fstab echo "硬盘挂载成功" } checkDataMountpoint() { echo '挂载数据盘' grep "$1" /etc/fstab | grep ext4 if [ $? -ne 0 ];then checkAndMountDataDisk else echo '数据盘已挂载' mount -a fi cpAndUntar } mustBeRoot checkDataMountpoint ${1-/data} lsblk 首先使用lsblk查看当前系统硬盘挂载的情况 ...

October 18, 2019 · datewu

证书问题

docker run调试某个container报如下所示x509证书错误,一开始怀疑是容器网络(--network host) 的问题 : 1 2 3 4 5 6 7 8 9 10 11 12 13 14 15 16 17 [deoops@dev-3 ~]# docker run --network host datewu/controller:v0.0.2 {"level":"panic","error":"Get https://google.com: x509: certificate signed by unknown authority","time":1555498448,"message":"get max item failed"} panic: get max item failed goroutine 26 [running]: github.com/rs/zerolog.(*Logger).Panic.func1(0x7773e9, 0x13) /Users/deoops/go/pkg/mod/github.com/rs/[email protected]/log.go:307 +0x4f github.com/rs/zerolog.(*Event).msg(0xc00012e8a0, 0x7773e9, 0x13) /Users/deoops/go/pkg/mod/github.com/rs/[email protected]/event.go:141 +0x1c1 github.com/rs/zerolog.(*Event).Msg(...) /Users/deoops/go/pkg/mod/github.com/rs/[email protected]/event.go:105 main.catchUp() /Users/deoops/github/controller/work.go:69 +0x326 main.populate(0xc000114000) /Users/deoops/github/controller/worker.go:10 +0x26 created by main.initWork /Users/deoops/github/controller/work.go:84 +0x7f 错误信息大概是说 client 不能识别google的https 证书, 可能是base image alpine的问题。 ...

September 12, 2019 · datewu

细说kubeconfig

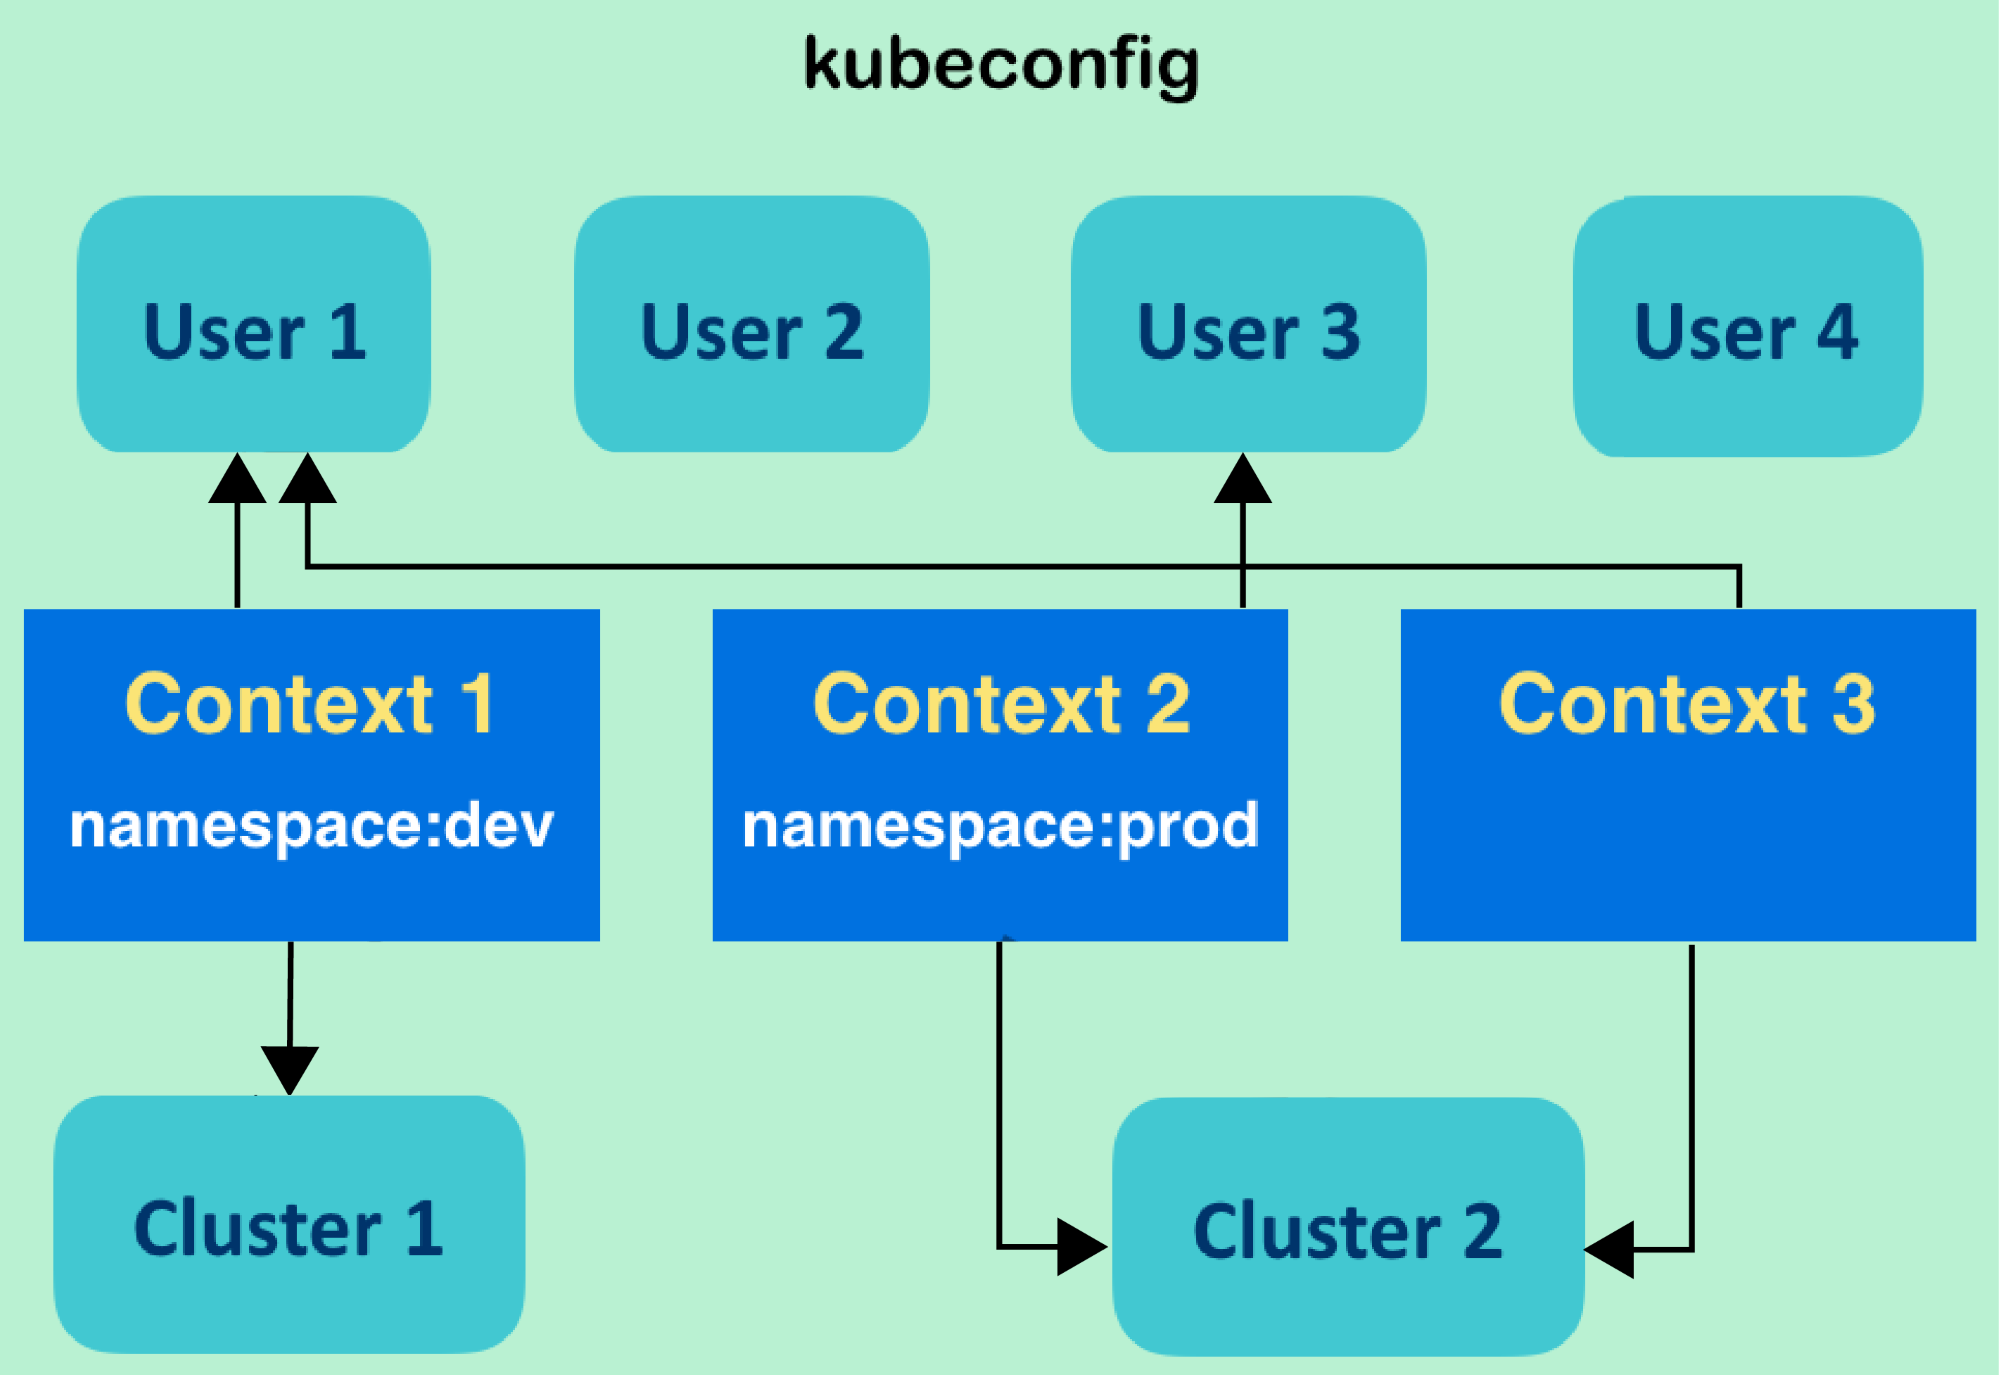
今天准备管理某一个kubernetes 集群时发现master主机22端口因为管理的需要被禁用了,无法登陆服务器。 问了一下运维人员,原来是基于安全原因,公司决定禁用所有服务器的root ssh登陆权限, 平时我都是ssh 登陆到master node,在服务器上直接使用kubectl命令 查看/部署/debug deployment/service等资源, 现在只好修改下本地 kubeconfig 文件,用自己本地的 kubectl 管理/操作kubernetes集群。 操作了一段时间后,发现用本地kubectl操作kubernetes体验蛮好的,特别是服务器缺少本地editor(vim) kubectl edit ... 的语法高亮支持。 配置kubeconfig过程分享如下,大体上说过就两步: 添加 context; use context。 1 2 vim .kube/config kubectl config use-context dev-8-admin@kubernetes 除了使用vim 编辑 .kube/config 文件,对于一些简单的配置也可以使用kubectl config command 快速配置kubeconfig: 1 2 3 4 5 6 7 8 9 10 11 12 13 ## create new cluster kubectl config set-cluster NAME [--server=server] [--certificate-authority=path/to/certificate/authority] [--insecure-skip-tls-verify=true] ## create new user kubectl config set-credentials NAME [--client-certificate=path/to/certfile] [--client-key=path/to/keyfile] [--token=bearer_token] [--username=basic_user] [--password=basic_password] [--auth-provider=provider_name] [--auth-provider-arg=key=value] [options] ## create new context kubectl config set-context [NAME | --current] [--cluster=cluster_nickname] [--user=user_nickname] [--namespace=namespace] [options] ## use context kubectl config use-context CONTEXT_NAME [options] 另外,kubectl config set 不支持对 certificate-authority-data字段的设置,只支持指定data文件的路径, 所以推荐用vim 编辑kubeconfig文件。 ...

August 11, 2019 · datewu

Systemd配置问题

问题 用 kubeadm 部署 kubernetes 集群,启动kubelet服务后,kubelet daemon 会认为 /etc/sysconfig/kubelet内容的优先级更高, 覆盖KUBELET_EXTRA_ARGS环境变量--pod-infra-container-image的配置内容。 分析 kubelet.service文件 首先查看/etc/systemd/system/kubelet.service文件: 1 2 3 4 5 6 7 8 9 10 11 12 13 # cat /etc/systemd/system/kubelet.service [Unit] Description=kubelet: The Kubernetes Node Agent Documentation=https://kubernetes.io/docs/ [Service] ExecStart=/usr/bin/kubelet Restart=always StartLimitInterval=0 RestartSec=10 [Install] WantedBy=multi-user.target 注意第5行的ExecStart指令为/usr/bin/kubelet kubelet.service.d 目录 然后查看kubelet服务的配置目录/etc/systemd/system/kubelet.service.d/,注意 kubeadm会在这里创建一个10-kubeadm.conf文件来配置kubelet启动方式(参数)。 1 2 3 4 5 6 7 8 9 10 11 12 13 # cat /etc/systemd/system/kubelet.service.d/10-kubeadm.conf # Note: This dropin only works with kubeadm and kubelet v1.11+ [Service] Environment="KUBELET_KUBECONFIG_ARGS=--bootstrap-kubeconfig=/etc/kubernetes/bootstrap-kubelet.conf --kubeconfig=/etc/kubernetes/kubelet.conf" Environment="KUBELET_CONFIG_ARGS=--config=/var/lib/kubelet/config.yaml" # This is a file that "kubeadm init" and "kubeadm join" generates at runtime, populating the KUBELET_KUBEADM_ARGS variable dynamically EnvironmentFile=-/var/lib/kubelet/kubeadm-flags.env # This is a file that the user can use for overrides of the kubelet args as a last resort. Preferably, the user should use # the .NodeRegistration.KubeletExtraArgs object in the configuration files instead. KUBELET_EXTRA_ARGS should be sourced from this file. EnvironmentFile=-/etc/sysconfig/kubelet ExecStart= ExecStart=/usr/bin/kubelet $KUBELET_KUBECONFIG_ARGS $KUBELET_CONFIG_ARGS $KUBELET_KUBEADM_ARGS $KUBELET_EXTRA_ARGS 配置文件的load的顺序是以字母顺序排列的, 如果我们也在这里创建了kubelet的配置文件,比如20-my-kubelet.conf,10-*会先被读取,20-*其次。 ...

May 11, 2019 · datewu

Neutron小记

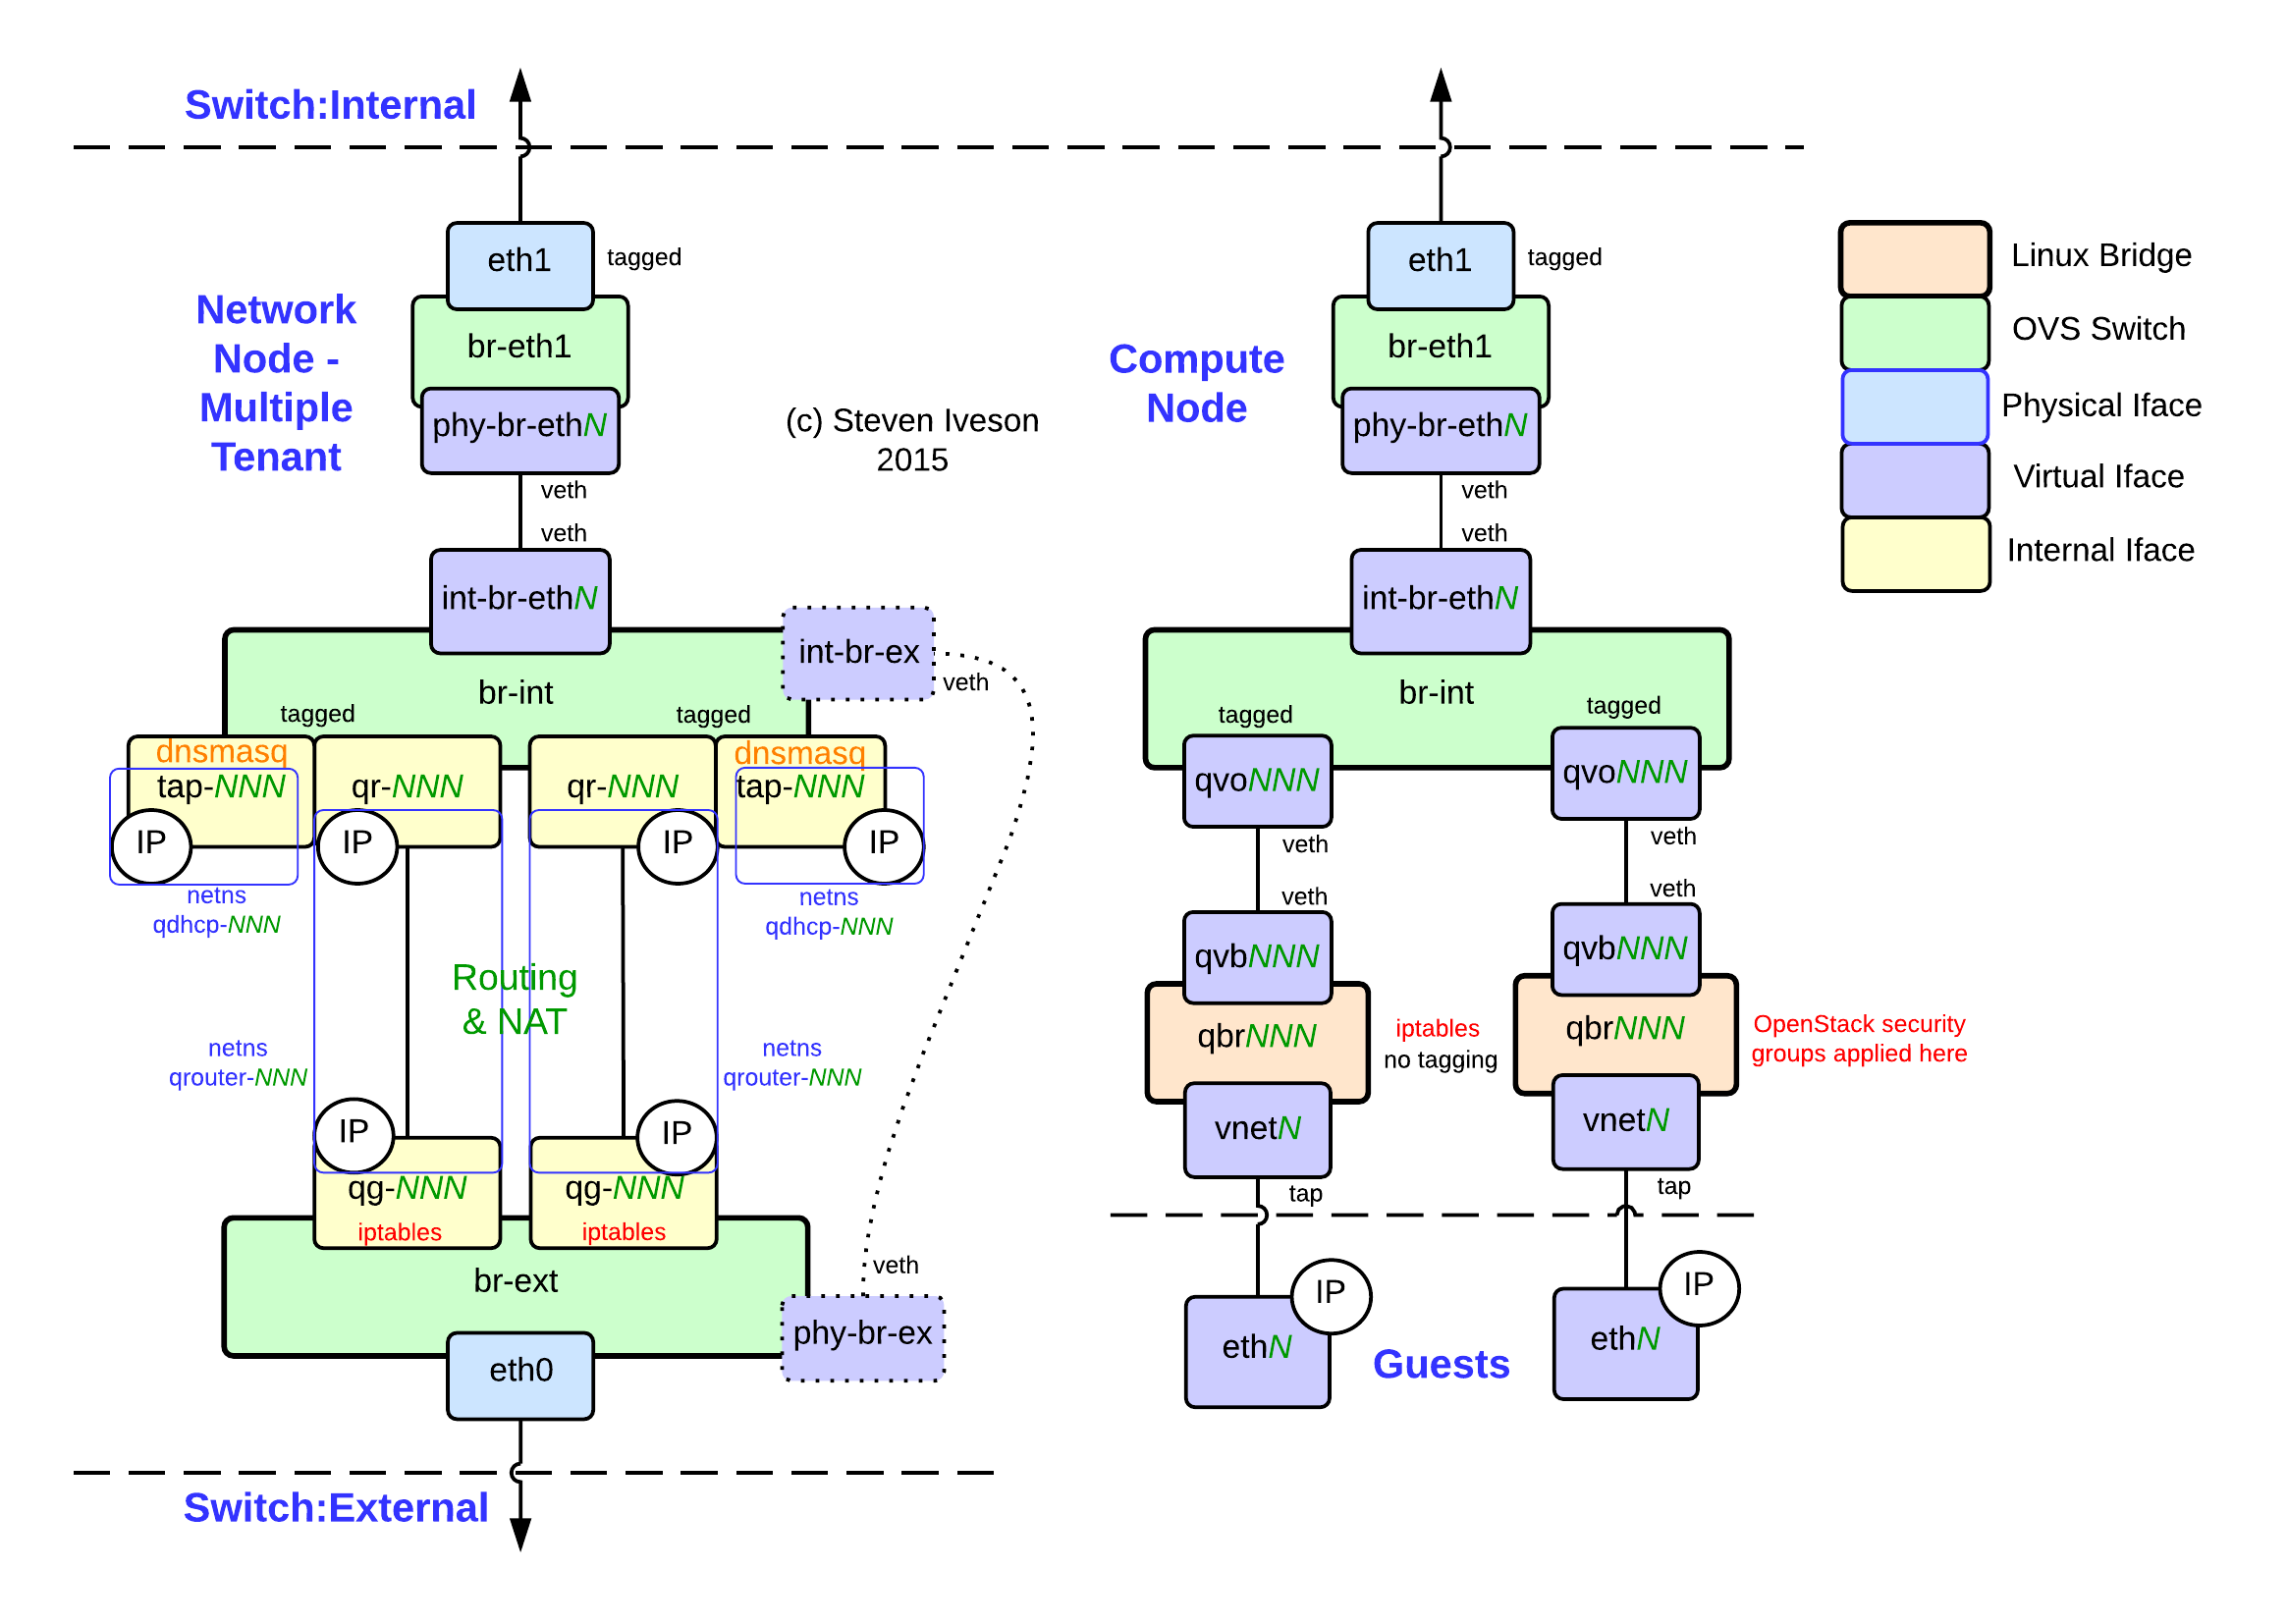
前段时间的花了很多功夫对接k8s和openstack的kuryr-kubernetes网路组件。 学到了很多openstack的知识,今天抽出时间来整理下。 client 首先是 install openstack-cli neutron client: 1 2 3 4 5 6 7 8 9 10 11 12 13 14 15 #!/bin/bash [root@deoops ~]# cat /etc/redhat-release Red Hat Enterprise Linux Server release 7.5 (Maipo) #### add openstack yum repo source [root@deoops ~]# vi /etc/yum.repos.d/openstack.repo [root@deoops ~]# yum install -y python2-openstackclient openstack-neutron [root@deoops shells]# cat source export OS_PROJECT_DOMAIN_NAME=default export OS_USER_DOMAIN_NAME=default export OS_PROJECT_NAME=your_project_name export OS_USERNAME=your_use_name export OS_PASSWORD=your_pwd export OS_AUTH_URL=http://10.8.1.3:35357/v3 export OS_IDENTITY_API_VERSION=3 export OS_IMAGE_API_VERSION=2 vip 我们来创建一个virtual IP验证上一步配置的openstack source对不对 : ...

April 21, 2019 · datewu

nopCloser函数

update: ioutil逐渐被io 取代。 1 2 3 4 5 6 7 8 9 10 11 12 13 14 15 package ioutil // import "io/ioutil" func NopCloser(r io.Reader) io.ReadCloser NopCloser returns a ReadCloser with a no-op Close method wrapping the provided Reader r. As of Go 1.16, this function simply calls io.NopCloser. package io // import "io" func NopCloser(r Reader) ReadCloser NopCloser returns a ReadCloser with a no-op Close method wrapping the provided Reader r. 最近使用baloo写集成测试,遇到了个需求, 在unmarshalrespones之后(或者之前)还要再输出一次response的纯文本格式供debug参考。 即需要多次读http.Resp.Body。 问题 response.Body 只能读一次,读完之后再进行read操作就会遇到EOF error。 分析问题 模糊记得baloo在一次请求中能多次(JSON() 和 String())读取response.Body内容。 仔细去看了下baloo的源代码,发现baloo自己在内部 封装了一个对象 http.RawResonse ,使用了 iouti.NopCloser函数重新填充了res.Body: 1 2 3 4 5 6 7 8 9 10 func readBodyJSON(res *http.Response) ([]byte, error) { body, err := ioutil.ReadAll(res.Body) if err != nil { return []byte{}, err } // Re-fill body reader stream after reading it res.Body = ioutil.NopCloser(bytes.NewBuffer(body)) return body, err } 解决方案 有了 ioutil.NopCloser函数,可以很快速的写出debugPlugin: ...

April 17, 2019 · datewu

Mysql Autocommit问题

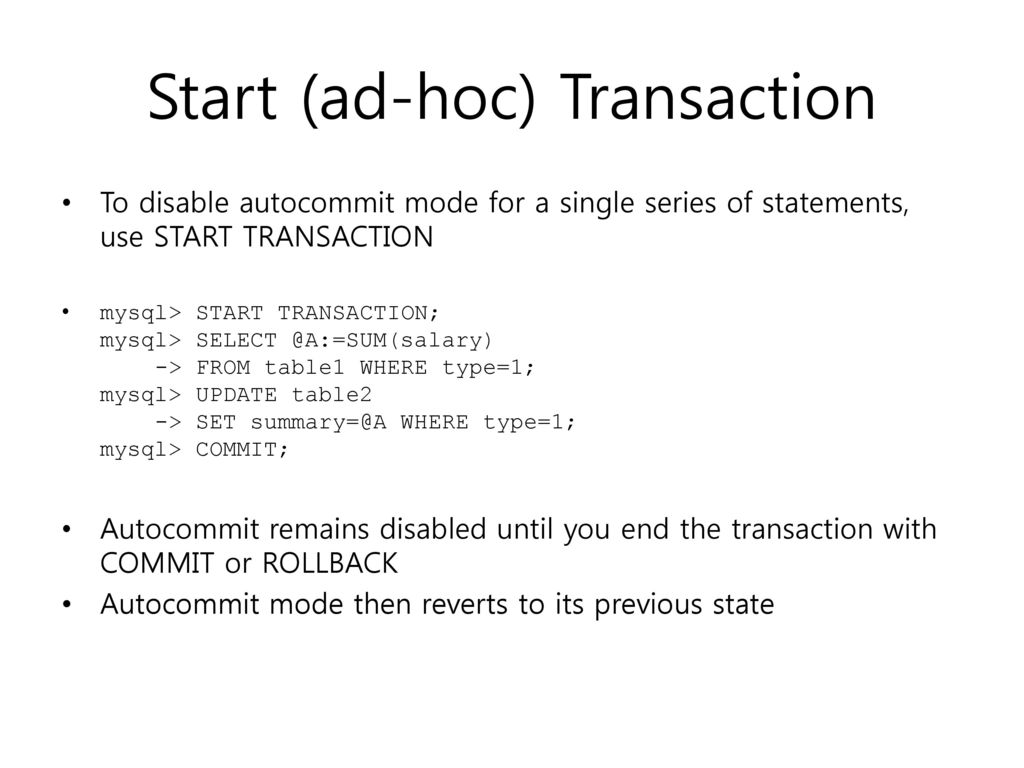
客户反馈我们的产品有个很奇怪的问题。 添加完商品后,可以看到商品,但是一刷新页面,刚才添加的商品就消失啦。 以前没碰到过,一直都用的好好的为什么今天就不行了呢? 分析问题 既然一刷新即消失了,就证明没有写入到数据库。 没写入到数据库是什么原因呢? API 也没有报错呀? 更加奇怪的是,有的页面有这个问题,有的没有这个问题。 后端的API 有的是golang写的,有的是Java写的。 golang orm对mysql 数据库的写操作存在上面说的刷新就丢失的问题,Java的orm对mysql的写操作没有问题。 这是为什么呢? DBA 排查了很久发现原来是客户那边的DBA把 mysql的 session autocommit的配置关闭啦。 autocommit 翻了下文档,确定 Java的orm框架会忽略mysql server的配置默认自己commit,golang的orm则没有这个优化(也许是有但我们没有启用?)。 所以会出现 java的后端是正常的,golang的后端写不了mysql。 解决方案 客户DBA开启autocommit配置项后,产品业务恢复正常。

April 12, 2019 · datewu

Macvlan路由规则

对macvlan 不熟悉的同学,可以先看下这篇macvlan virtual network简介 默认情况下Linux kernel会阻止(drop)宿主机(host eth0)虚拟出来的 macvlan network(bridge mode) 和宿主机host eth0)之间网络数据包。 调试了一段时间后,我们发现了可以通过路由表来绕过这个限制。 具体实施的方法如下: 在host network namesapces下新增 一个macvlan device,然后添加路由规则即可。 通信的两个方向简单解释如下: eth0(host) -> pod(macvlan) 宿主机host eth0 通过break0 设备 和route table的路由规则 可以访问到pod(在macvlan中) shell调试脚本如下: 1 2 3 4 5 6 ip link add break0 link eth0 type macvlan mode bridge # NOTE: if use /24 CIDR will auto add a route rule # (100.75.30.0/24 dev break0 proto kernel scope link src 100.75.30.1) # which we don't need ifconfig break0 100.75.30.7/32 up ip r a 100.75.30.71 dev break0 # 100.75.30.71 is a pod ip for test 因为kuryr是用python配置网络的,所以也提供对应的python脚本如下: ...

March 11, 2019 · datewu