替换k8s所有证书

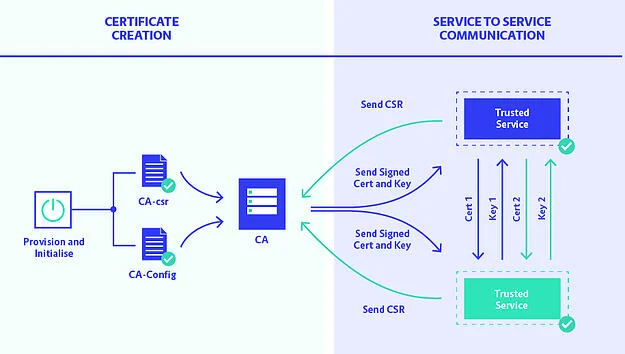
客户需要把kubernetes apiserver/etcd/kubelet/kubectl 等所有的证书有效期修改为100年。 很明显这是一个不合理的需求,不过客户说什么就是什么。 于是经几天的调试有了下面的这个 Makefile批量生成所有(FILES变量)的证书。 如果对makefile的语法不熟悉,可以看看Makefile简介 makefile 1 2 3 4 5 6 7 8 9 10 11 12 13 14 15 16 17 18 19 20 21 22 23 24 25 26 27 28 29 30 31 32 33 34 35 36 37 38 39 40 41 42 43 44 45 46 47 48 49 50 51 52 53 54 55 56 57 58 59 60 61 62 63 64 65 66 67 68 69 70 71 72 73 74 FILES = ca.crt ca.key sa.key sa.pub front-proxy-ca.crt front-proxy-ca.key etcd_ca.crt etcd_ca.key CONFS = admin.conf controller-manager.conf kubelet.conf scheduler.conf SELFS = kubelet.crt.self kubelet.crt.key #KEYs = ca.key front-proxy-ca.key etcd_ca.key sa.key #CAs = ca.crt front-proxy-ca.crt etcd_ca.crt #PUBs = sa.pub ## kubernetes will sign certificate ## automatically, so below ## csr/cert is for test purpose #CSR = apiserver.csr apiserver-kubelet-client.csr CERT_KEYS = apiserver.key apiserver-kubelet-client.key front-proxy-client.key CERTS = apiserver.cert apiserver-kubelet-client.cert front-proxy-client.cert # openssl genrsa -des3 -out rootCA.key 4096 CMD_CREATE_PRIVATE_KEY = openssl genrsa -out $@ 2048 CMD_CREATE_PUBLIC_KEY = openssl rsa -in $< -pubout -out $@ # openssl req -x509 -new -nodes -key rootCA.key -sha256 -days 1024 -out rootCA.crt CMD_CREATE_CA = openssl req -x509 -new -nodes -key $< -sha256 -days 36500 -out $@ -subj '/CN=kubernetes' # openssl req -new -key mydomain.com.key -out mydomain.com.csr CMD_CREATE_CSR = openssl req -new -key $< -out $@ -config $(word 2,$^) # openssl x509 -req -in mydomain.com.csr -CA rootCA.crt -CAkey rootCA.key -CAcreateserial -out mydomain.com.crt -days 500 -sha256 CMD_SIGN_CERT = openssl x509 -req -in $< -CA $(word 2,$^) -CAkey $(word 3,$^) -CAcreateserial -out $@ -days 36500 -sha256 -extfile $(word 4,$^) -extensions my_extensions # generata self sign certificate CMD_CREATE_CERT = openssl req -x509 -new -nodes -key $< -sha256 -days 36500 -out $@ -subj '/CN=nodeXXX@timestamp1531732165' CMD_MSG = @echo generating $@ ... MASTER_IP := 192.168.1.200 ## REMEMBER CHANGE ME .PHONY: all clean check self_sign rename all: ${FILES} ${CONFS} ${CERT_KEYS} ${CERTS} clean: -rm ${FILES} ${CONFS} ${CERT_KEYS} ${CERTS} self_sign: ${SELFS} check: for f in *.cert *.crt; do echo $$f; openssl x509 -noout -dates -in $$f; echo '==='; done rename: for f in *.cert; do echo $$f; mv $$f $${f%.*}.crt; echo '====='; done %.key: ${CMD_MSG} ${CMD_CREATE_PRIVATE_KEY} %.pub: %.key ${CMD_MSG} ${CMD_CREATE_PUBLIC_KEY} %.self: %.key ${CMD_MSG} ${CMD_CREATE_CERT} %.crt: %.key ${CMD_MSG} ${CMD_CREATE_CA} %.csr: %.key %.csr.cnf ${CMD_MSG} ${CMD_CREATE_CSR} %.cert: %.csr ca.crt ca.key %.csr.cnf #%.cert: %.csr front-proxy-ca.crt front-proxy-ca.key %.csr.cnf ${CMD_MSG} ${CMD_SIGN_CERT} %.conf: %.cert %-conf.sh sh $(word 2,$^) ${MASTER_IP} 上面的Makefile还需要对应的csr和 conffiles。 ...
August 10, 2018 · datewu

flannel vpc

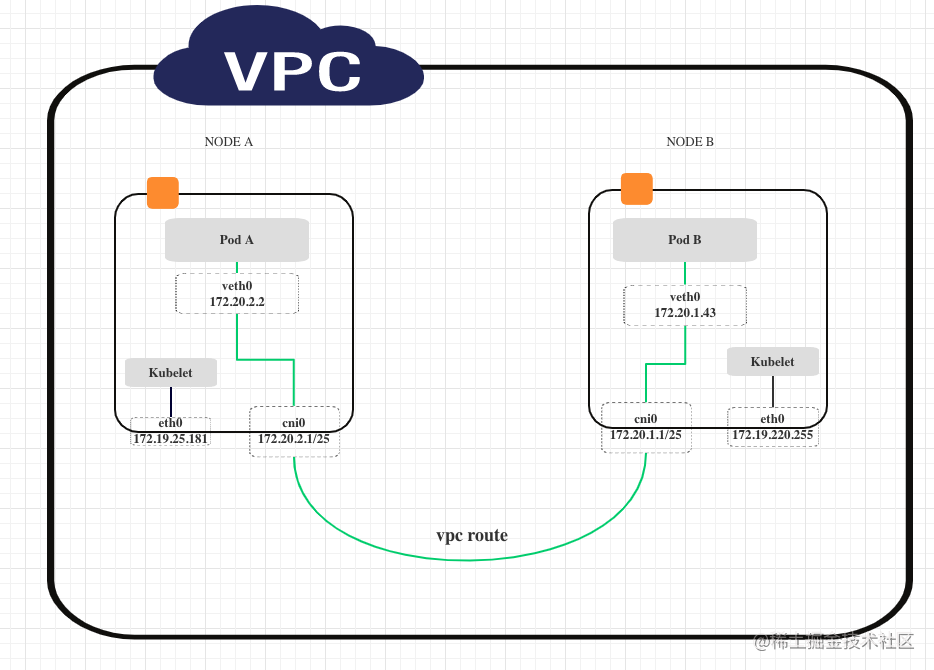
update: flannel从v0.14.0(2021/05/27)开始已经支持腾讯云的vpc backend了。 客户需要在腾讯云上部署kubernetes集群而且选用的网络插件是flannel,所以我们需要为flannel 添加 腾讯云 vpc 的 backend 适配。 我大致看了下github上 阿里云 和 aws 适配器的代码,发现并不复杂,flannel已经把所有的dirty work flannel 都包装好API了。 稍稍了解一些网络设备或者Linux网络相关的命令(比如route table)就可以比较轻松的写出flannel适配器。 整个适配过程可以分为下面4个步骤: 定义 TxVpcBackend struct, 实现New func 在init func中注册; 调用腾讯云SDK 实现 RegisterNetwork method; 最后在main.go中 注册腾讯云backend 即可; 部署deployment 的时候选择 tx-vpc 的backend 即可. 下面结合部分代码具体的说下实现过程: 开发 定义结构体 只是搭一个架子,方便注册到flannel backend上,不含具体适配器的逻辑: 1 2 3 4 5 6 7 8 9 10 11 12 13 14 15 16 17 type TxVpcBackend struct { sm subnet.Manager extIface *backend.ExternalInterface } func New(sm subnet.Manager, extIface *backend.ExternalInterface) (backend.Backend, error) { be := TxVpcBackend{ sm: sm, extIface: extIface, } return &be, nil } func init() { backend.Register("tx-vpc", New) } 实现RegisterNetwork 1 2 3 4 5 6 7 8 9 10 11 12 13 14 15 16 17 18 19 20 21 22 23 24 25 26 27 28 29 30 31 32 33 34 35 36 37 38 39 40 41 42 43 44 45 46 47 48 func (be *TxVpcBackend) RegisterNetwork(ctx context.Context, config *subnet.Config) (backend.Network, error) { // 1. Parse our configuration cfg := struct { AccessKeyID string AccessKeySecret string }{} if len(config.Backend) > 0 { if err := json.Unmarshal(config.Backend, &cfg); err != nil { return nil, fmt.Errorf("error decoding VPC backend config: %v", err) } } log.Infof("Unmarshal Configure : %v\n", cfg) // 2. Acquire the lease form subnet manager attrs := subnet.LeaseAttrs{ PublicIP: ip.FromIP(be.extIface.ExtAddr), } l, err := be.sm.AcquireLease(ctx, &attrs) switch err { case nil: case context.Canceled, context.DeadlineExceeded: return nil, err default: return nil, fmt.Errorf("failed to acquire lease: %v", err) } if cfg.AccessKeyID == "" || cfg.AccessKeySecret == "" { cfg.AccessKeyID = os.Getenv("ACCESS_KEY_ID") cfg.AccessKeySecret = os.Getenv("ACCESS_KEY_SECRET") if cfg.AccessKeyID == "" || cfg.AccessKeySecret == "" { return nil, fmt.Errorf("ACCESS_KEY_ID and ACCESS_KEY_SECRET must be provided! ") } } err = createRoute(l.Subnet.String(), cfg.AccessKeyID, cfg.AccessKeySecret) if err != nil { log.Errorf("Error DescribeVRouters: %s .\n", err.Error()) } return &backend.SimpleNetwork{ SubnetLease: l, ExtIface: be.extIface, }, nil } 主要逻辑是 使用腾讯云的SDK 在vpc 网络下创建route , 即上面的 ...

August 8, 2018 · datewu

Makefile简介

网络上关于 makefile的教程有很多,由于我日常不是写c/c++的, 不常使用makefile,需要用的时候总是要重新Google搜索makefile的语法。 索性整理出来这篇 makefile 教程,备忘。 教程 Makefile简易教程: 基本语法 1 2 3 4 target: dependency1 dependency2 ... [TAB] action1 [TAB] action2 ... 下面的makefile摘抄自GNU Make in Detail for Beginners,这篇入门文章把makefile的语法写的非常透彻。 推荐大家多读几遍 1 2 3 4 5 6 7 8 9 10 11 12 13 14 15 16 17 18 19 20 21 22 23 24 25 26 27 28 29 30 31 32 33 34 35 36 37 38 39 40 41 42 43 44 45 ##### makefile for compile C programs # Compiler to use CC = gcc # -g for debug, -O2 for optimise and -Wall additonal messages OPTIONS = -O2 -g -Wall # Directory for header file INCLUDES = -I . # List of objects to be build OBJS = main.o module.o .PHONY: all list clean all: ${OBJS} @echo "Building..." # print "Building..." message ${CC} ${OPTIONS} ${INCLUDES} ${OBJS} -o main_bin %.o: %.c # '%' pattern wildcard matching ${CC} ${OPTIONS} ${INCLUDES} -c %.c list: @echo $(shell ls) # print output of command `ls` clean: @echo Cleaning up... -rm -rf *.0 # '-' prefix for ignoring errors and continue execution -rm main_bin #### makefile for img manage FILES = $(shell find imgs -type f -iname "*.jpg" | sed 's/imgs/thumb/g') CONVERT_CMD = convert -resize "100x100" $< $@ MSG = "\nUpdating thumbnail" $@ all_thumb: ${FILES} thumb/%.jpg: imgs/%.jpg ${MSG} ${CONVERT_CMD} thumb/%.JPG: imgs/%.JPG ${MSG} ${CONVERT_CMD} clean_all: @echo Cleaning up files... -rm -rf thumb/*.{jpg,JPG} 变量 赋值 Simple assignment (:=) We can assign values (RHS) to variables (LHS) with this operator, for example: CC := gcc. With simple assignment (:=), the value is expanded and stored to all occurrences in the Makefile when its first definition is found. ...

July 27, 2018 · datewu

事件驱动

在shell脚本里使用mkfifo命令创建named pipes可以实现简单的事件驱动, 避免poll(轮询)带来的时延(not real-time)和资源消耗的问题。 mkfifo 1 2 3 4 5 6 7 8 9 10 11 12 13 14 ❯ man mkfifo | head -n 12 MKFIFO(1) General Commands Manual MKFIFO(1) NAME mkfifo – make fifos SYNOPSIS mkfifo [-m mode] fifo_name ... DESCRIPTION mkfifo creates the fifos requested, in the order specified. By default, the resulting fifos have mode 0666 (rw-rw-rw-), limited by the current umask(2). ~ consumer 消费者以blocked的状态监听事件的发生,然后handle: ...

June 27, 2018 · datewu

审计目录

今天调试容器应用的时候发现,app运行一段时间后,容器外挂的一个volumn会偶发性的被删除。 于是需要监控下到底是谁/哪个进程把文件目录给删除了。 google一阵子后,发现可以使用auditd 服务来监控和搜索出都有那些进程操作够目标文件/目录。 整个过程分为3步: 开启 auditd 服务; 使用auditctl 配置 auditd服务; 一段时间之后 使用 ausearch 来查看/搜索审计的日志。 启动监控 开启auditd服务: 1 2 systemctl start auditd ## you may need `mkdir /var/log/audit` 添加监控规则 编辑审计规则: 1 2 3 4 5 6 7 8 ## list existing rules auditctl -l ## clean existing rules auditctl -D ## watch /var/run/yourfolder auditctl -w /var/run/yourfolder -p war -k serachkey auditctl语法 1 2 3 4 5 6 7 8 9 10 11 12 13 14 15 16 17 18 19 20 21 22 23 24 25 26 27 28 29 30 31 32 33 34 35 36 [root@ddeoops ~]# auditctl -h usage: auditctl [options] -a <l,a> Append rule to end of <l>ist with <a>ction -A <l,a> Add rule at beginning of <l>ist with <a>ction -b <backlog> Set max number of outstanding audit buffers allowed Default=64 -c Continue through errors in rules -C f=f Compare collected fields if available: Field name, operator(=,!=), field name -d <l,a> Delete rule from <l>ist with <a>ction l=task,exit,user,exclude a=never,always -D Delete all rules and watches -e [0..2] Set enabled flag -f [0..2] Set failure flag 0=silent 1=printk 2=panic -F f=v Build rule: field name, operator(=,!=,<,>,<=, >=,&,&=) value -h Help -i Ignore errors when reading rules from file -k <key> Set filter key on audit rule -l List rules -m text Send a user-space message -p [r|w|x|a] Set permissions filter on watch r=read, w=write, x=execute, a=attribute -q <mount,subtree> make subtree part of mount point's dir watches -r <rate> Set limit in messages/sec (0=none) -R <file> read rules from file -s Report status -S syscall Build rule: syscall name or number -t Trim directory watches -v Version -w <path> Insert watch at <path> -W <path> Remove watch at <path> --loginuid-immutable Make loginuids unchangeable once set --reset-lost Reset the lost record counter 分析日志 查看/搜索 审计日志: ...

June 20, 2018 · datewu

内核升级

众所周知centos的内核版本选择很保守,很多新内核的新特性,特别是网络和debug方面的特性都没有,所以我们来给centos升级下 kernel吧。 整个升级安装的过程其实挺简单的一共分为4步: 找到repo源; yum安装最新的kernel; 修改grub2启动项; 移除旧的kernel。 安装 elrepo 访问elrepo website查看对应 centos 版本最新的kernel repo源。 然后使用rpm添加kernel源: 1 2 rpm --import https://www.elrepo.org/RPM-GPG-KEY-elrepo.org rpm -Uvh http://www.elrepo.org/elrepo-release-7.0-3.el7.elrepo.noarch.rpm install 安装内核: 1 2 yum --disablerepo="\*" --enablerepo="elrepo-kernel" list available yum --enablerepo=elrepo-kernel install kernel-ml kernel-ml-devel boot 修改grub2启动项,开机使用新的内核: 1 2 3 awk -F\' '$1=="menuentry " {print i++ " : " $2}' /etc/grub2.cfg grub2-set-default 0 init 6 cleanup 删除旧内核 1 2 3 yum install yum-utils package-cleanup --oldkernels --count=1 uname -a 参考 How to Upgrade Kernel on CentOS 7 ...

May 16, 2018 · datewu

vim配置

使用vim有7,8年了,整理一下自己用到的vim配置,方便自查。 vim basic 基本设置,语法高亮,行号,等等: 1 2 3 4 execute pathogen#infect() syntax on filetype plugin indent on set number paste 复制粘贴: disable auto indent 1 set paste Notice the “– INSERT (paste) –” at the bottom of the Vim window. fold 代码折叠: Folding wiki 1 2 " close zc " open zo font 安装字体: install powerline font 1 2 3 wget https://github.com/powerline/powerline/raw/develop/font/PowerlineSymbols.otf open . # double click the otf file you've just downloaded. kubectl eidt issue 使用kubectl edit时,当yaml文件的annotation行过大会报错: ...

May 14, 2018 · datewu

配置vscode eslint

离职一段时间了,需要自己写点前端代码。 奈何vim的js插件对jsx的支持不太友好,所以转向vscode写点jsx。 写了些react app代码后,IDE到处飘红色的波浪线〰️〰️〰️,很是恼人。 全局配置react eslint好多了, 记录下配置的过程备查。 配置 基本上是用了airbnb的配置: 具体的步骤很简单,两步就好了: npm安装eslint和要用到plugin; 根据需求配置全局的eslintrc文件 plugin 1 2 3 4 5 6 7 8 9 10 11 12 13 npm install -g jshint npm install -g eslint eslint-config-airbnb-base eslint-plugin-import vi .eslintrc.js ls -alh /usr/local/bin/npm ls /usr/local/lib/node_modules/eslint-config-airbnb-base npm link eslint-config-airbnb-base ls node_modules npm link eslint-plugin-import npm i -g eslint-plugin-react npm i -g eslint-plugin-jsx-a11y npm link eslint-plugin-jsx-a11y eslint-plugin-react vi .eslintrc.js .elinttc.js 1 2 3 4 5 6 7 8 9 10 11 12 13 14 15 16 17 18 19 20 21 // ~/.eslintrc.js module.exports = { parser: "babel-eslint", "plugins": ["react"], "extends": [ "airbnb-base", "eslint:recommended", "plugin:react/recommended", ], "rules": { // "no-unused-vars":0, "no-console": 'off', "max-len": [1,120,2,{ignoreComments: true}] // "prop-types": [2] }, "env": { "browser": true, "node": true, "jasmine": true } }; 参考 react eslint webpack babel ...

April 16, 2018 · datewu

配置http selinux

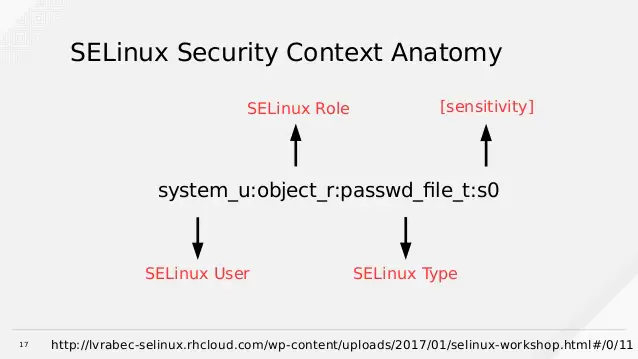
今天在digitocean一台新申请的主机上部署web应用。部署完成,打开浏览器发现报错403。 部署的web应用很简单,后端用nginx做了反向代理,应该没啥大问题。 进一步打开chrome的console,发现对static file的访问报错403,还没到后端就已经报错了, 估计后面的 upstream socket也会报错。 ssh登陆到服务器上看了下nginx的日志,发现是权限的问题。 进一步debug了之后发现虚拟机开启selinux,当时心头就一紧,估计要改selinux配置了,这是个麻烦事儿。 想简单点直接关闭selinux,转念一想digitocean的主机直接暴露在interner上,开着selinux 其实是个很好的保护。digitocean打开自有它打开的道理,我猜可能有很多vm被攻破沦为僵尸网络了。 google搜索了selinux的web server常用的配置,验证后,解决了nginx 403的问题。记录分享如下: check seLinux 查看系统状态 查看selinux配置和状态 1 2 3 4 5 6 7 8 9 10 11 12 13 14 15 16 17 18 19 20 21 22 23 24 25 26 [root@deo ~]# sestatus -v SELinux status: enabled SELinuxfs mount: /sys/fs/selinux SELinux root directory: /etc/selinux Loaded policy name: targeted Current mode: enforcing Mode from config file: enforcing Policy MLS status: enabled Policy deny_unknown status: allowed Max kernel policy version: 28 Process contexts: Current context: unconfined_u:unconfined_r:unconfined_t:s0-s0:c0.c1023 Init context: system_u:system_r:init_t:s0 /usr/sbin/sshd system_u:system_r:sshd_t:s0-s0:c0.c1023 File contexts: Controlling terminal: unconfined_u:object_r:user_devpts_t:s0 /etc/passwd system_u:object_r:passwd_file_t:s0 /etc/shadow system_u:object_r:shadow_t:s0 /bin/bash system_u:object_r:shell_exec_t:s0 /bin/login system_u:object_r:login_exec_t:s0 /bin/sh system_u:object_r:bin_t:s0 -> system_u:object_r:shell_exec_t:s0 /sbin/agetty system_u:object_r:getty_exec_t:s0 /sbin/init system_u:object_r:bin_t:s0 -> system_u:object_r:init_exec_t:s0 /usr/sbin/sshd system_u:object_r:sshd_exec_t:s0 查看文件目录的selinux label 1 2 3 4 5 6 [root@deo ]# ls -Z /opt/todolist -rw-r--r--. root root unconfined_u:object_r:admin_home_t:s0 index.html drwxr-xr-x. root root unconfined_u:object_r:admin_home_t:s0 static [root@deo ]# ls -Z /usr/share/nginx/html -rw-r--r--. root root system_u:object_r:httpd_sys_content_t:s0 50x.html -rw-r--r--. root root system_u:object_r:httpd_sys_content_t:s0 index.html meat 下面两种方法选一种就可以了 ...

April 16, 2018 · datewu

分页打印日志

默认配置命令git log会在新的窗口打印日志内容,需要敲一下键盘q 才能返回当前目录,不方便连续查看: 1 2 3 4 5 6 7 8 9 10 11 12 ➜ lgthw_orign git:(otherbranch) git log --oneline --decorate --all --graph ## NOTE content below will be displayed on new window/buff * 40303b7 (HEAD -> otherbranch) thirdcommit | * 3e6e2f7 (master) secondcommit |/ * f40475e (tag: firstcommittag) firstcommit (END) ## press `q` to exist ➜ lgthw_orign git:(master) git log --no-pager fatal: unrecognized argument: --no-pager 可以把默认的分页改为inline模式,可以更快的查看连续的日志: ...

April 14, 2018 · datewu