今天准备管理某一个kubernetes 集群时发现master主机22端口因为管理的需要被禁用了,无法登陆服务器。
问了一下运维人员,原来是基于安全原因,公司决定禁用所有服务器的root ssh登陆权限,
平时我都是ssh 登陆到master node,在服务器上直接使用kubectl命令 查看/部署/debug deployment/service等资源,
现在只好修改下本地 kubeconfig 文件,用自己本地的 kubectl 管理/操作kubernetes集群。
操作了一段时间后,发现用本地kubectl操作kubernetes体验蛮好的,特别是服务器缺少本地editor(vim) kubectl edit ... 的语法高亮支持。
配置kubeconfig过程分享如下,大体上说过就两步:
- 添加 context;
- use context。
1
2
| vim .kube/config
kubectl config use-context dev-8-admin@kubernetes
|
除了使用vim 编辑 .kube/config 文件,对于一些简单的配置也可以使用kubectl config command 快速配置kubeconfig:
 1
 2
 3
 4
 5
 6
 7
 8
 9
10
11
12
13
| ## create new cluster
kubectl config set-cluster NAME [--server=server] [--certificate-authority=path/to/certificate/authority] [--insecure-skip-tls-verify=true]
## create new user
kubectl config set-credentials NAME [--client-certificate=path/to/certfile] [--client-key=path/to/keyfile]
[--token=bearer_token] [--username=basic_user] [--password=basic_password] [--auth-provider=provider_name]
[--auth-provider-arg=key=value] [options]
## create new context
kubectl config set-context [NAME | --current] [--cluster=cluster_nickname] [--user=user_nickname] [--namespace=namespace] [options]
## use context
kubectl config use-context CONTEXT_NAME [options]
|
另外,kubectl config set 不支持对 certificate-authority-data字段的设置,只支持指定data文件的路径, 所以推荐用vim 编辑kubeconfig文件。
kuebconfig demo#
下面是一份配置好的 kubeconfig demo文件,供参考:
(略去了client 的证书, private key等敏感信息)
 1
 2
 3
 4
 5
 6
 7
 8
 9
10
11
12
13
14
15
16
17
18
19
20
21
22
23
24
25
26
27
28
29
30
31
| apiVersion: v1
clusters:
- cluster:
certificate-authority-data: YOUR kubernete CA BASE64 DATA
server: https://test-8:9443
name: dev-8
- cluster:
certificate-authority: /Users/r/.minikube/ca.crt
server: https://192.168.99.117:8443
name: minikube
contexts:
- context:
cluster: dev-8
user: dev-8-admin
name: dev-8-admin@kubernetes
- context:
cluster: minikube
user: minikube
name: minikube
current-context: test-8-admin@kubernetes
kind: Config
preferences: {}
users:
- name: dev-8-admin
user:
client-certificate-data: YOUR client CERT BASE64 DATA
client-key-data: YOUR client PRIVATE KEY DATA
- name: minikube
user:
client-certificate: /Users/r/.minikube/client.crt
client-key: /Users/r/.minikube/client.key
|
kubecofig 字段解释#
kubeconfig是什么,以及上面的编辑过程到底做了什么:
kubeconfig 是一个配置文件,这个配置文件使用了 yaml 文件的语法,主要记录了kubernetes 集群的认证信息。
kubectl 或者是其它的kubernetes client通过解析kubeconfig文件得到kubernetes cluster的认证信息,从而使用/管理 kubernetes 集群。
安装kubectl的时候,~/.kube/config文件就是一个kubeconfig,而且可以配置管理多个kubernetes集群。
kubeconfig的可读性很高,建议仔细通读下。
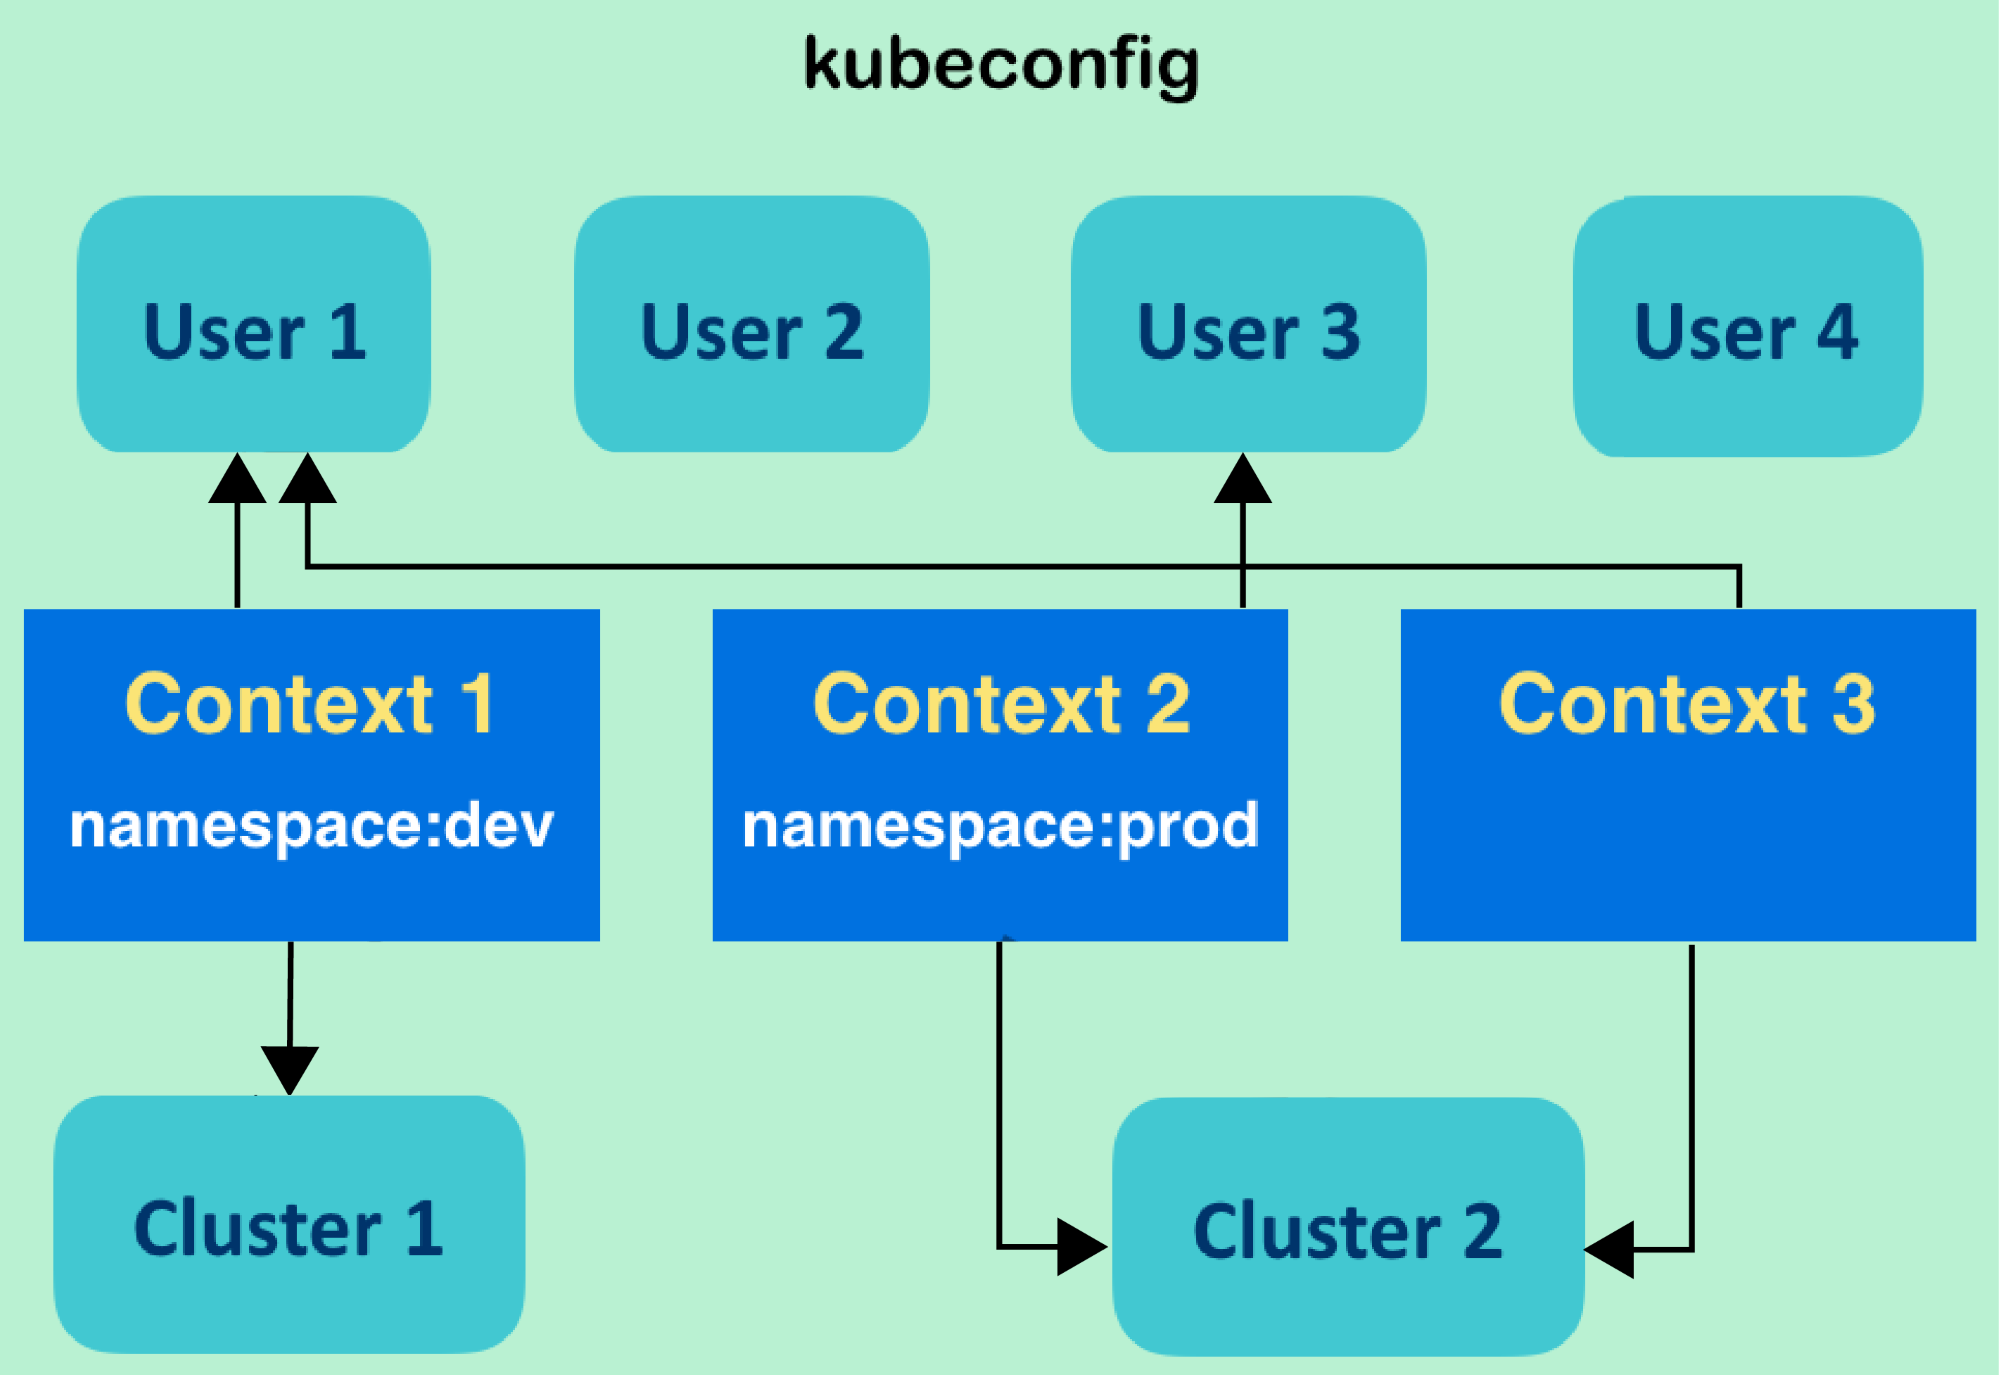
一个kubeconfig文件包含了3个对象, 一种关系:
一个 kubeconfg 可以包含 多个 context,多个 cluster, 多个 user。 每个 context 由一个cluster 和 user 组成。
cluster由 apiserver地址, server ca 信息,和cluster name 组成。
user (user 的定义其实就是 kubernetes client 的 auth 定义) 的定义相对灵活些:
- 可以是我上面贴出来的 certificate 认证信息;
- 也可以是 username/password 的认证信息(k3s 的kubeconfig 就是用的这种);
- 或者是用serviceAccount 的 token认证也可以,
总的说来一份auth 信息 和 一个name 对应了一个user 的定义。
大家应该注意到了 cluster 和 user 的组合可以很灵活,从而产生多种 context。
client-go操作kubecofig#
marshal#
把 restclient.Config 编码保存到文件:
 1
 2
 3
 4
 5
 6
 7
 8
 9
10
11
12
13
14
15
16
17
18
19
20
21
22
23
24
25
| package main
import (
"clientcmdapi "k8s.io/client-go/tools/clientcmd/api"
"k8s.io/client-go/tools/clientcmd"
)
// 节选,有删减
func snipedDumpKubeconfig() error {
// ...
globalKubeCfg := clientcmdapi.NewConfig()
globalKubeCfg.Clusters[clusterName] = clientcmdapi.NewCluster()
globalKubeCfg.Clusters[clusterName].Server = config.Host
globalKubeCfg.Clusters[clusterName].CertificateAuthorityData = config.CAData
globalKubeCfg.AuthInfos[authName] = clientcmdapi.NewAuthInfo()
globalKubeCfg.AuthInfos[authName].ClientCertificateData = config.CertData
globalKubeCfg.AuthInfos[authName].ClientKeyData = config.KeyData
globalKubeCfg.Contexts[contextName] = clientcmdapi.NewContext()
globalKubeCfg.Contexts[contextName].Cluster = clusterName
globalKubeCfg.Contexts[contextName].AuthInfo = authName
return clientcmd.WriteToFile(*globalKubeCfg, globalKubeconfFile)
}
|
unmarshal#
由 kubeconfig文件生成 restclient.Config:
在官方的 k8s.io/client-go/tools/clientcmd 包中可以找到example:
 1
 2
 3
 4
 5
 6
 7
 8
 9
10
11
12
13
14
15
16
17
18
19
20
21
22
23
24
25
26
27
28
29
| // RESTConfigFromKubeConfig is a convenience method to give back a restconfig from your kubeconfig bytes.
// For programmatic access, this is what you want 80% of the time
func RESTConfigFromKubeConfig(configBytes []byte) (*restclient.Config, error) {
clientConfig, err := NewClientConfigFromBytes(configBytes)
if err != nil {
return nil, err
}
return clientConfig.ClientConfig()
}
// BuildConfigFromFlags is a helper function that builds configs from a master
// url or a kubeconfig filepath. These are passed in as command line flags for cluster
// components. Warnings should reflect this usage. If neither masterUrl or kubeconfigPath
// are passed in we fallback to inClusterConfig. If inClusterConfig fails, we fallback
// to the default config.
func BuildConfigFromFlags(masterUrl, kubeconfigPath string) (*restclient.Config, error) {
if kubeconfigPath == "" && masterUrl == "" {
klog.Warningf("Neither --kubeconfig nor --master was specified. Using the inClusterConfig. This might not work.")
kubeconfig, err := restclient.InClusterConfig()
if err == nil {
return kubeconfig, nil
}
klog.Warning("error creating inClusterConfig, falling back to default config: ", err)
}
return NewNonInteractiveDeferredLoadingClientConfig(
&ClientConfigLoadingRules{ExplicitPath: kubeconfigPath},
&ConfigOverrides{ClusterInfo: clientcmdapi.Cluster{Server: masterUrl}}).ClientConfig()
}
|