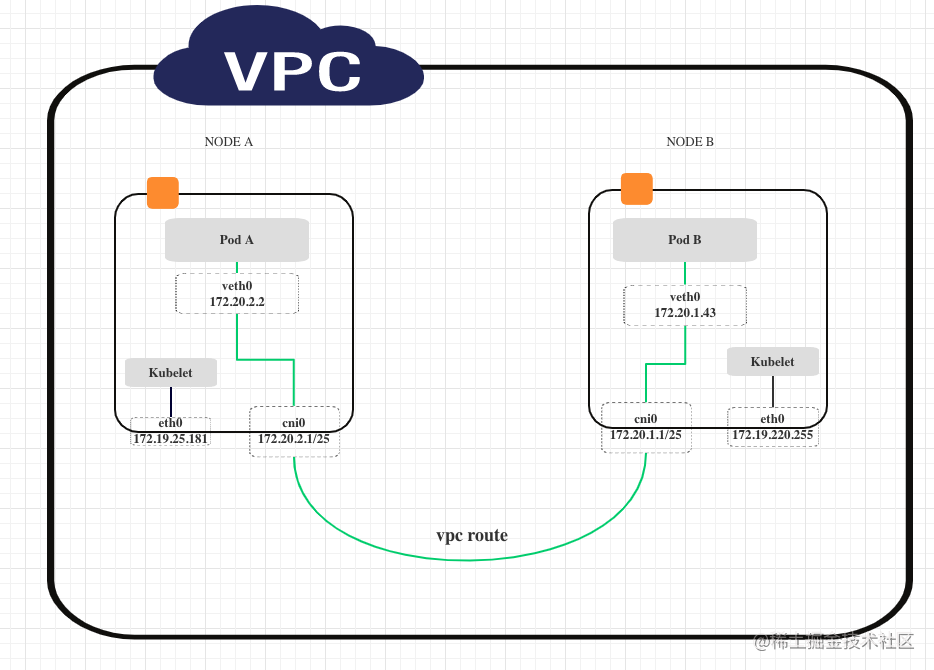
update: flannel从v0.14.0(2021/05/27)开始已经支持腾讯云的vpc backend了。
客户需要在腾讯云上部署kubernetes集群而且选用的网络插件是flannel,所以我们需要为flannel 添加 腾讯云 vpc 的 backend 适配。
我大致看了下github上 阿里云 和 aws 适配器的代码,发现并不复杂,flannel已经把所有的dirty work flannel 都包装好API了。
稍稍了解一些网络设备或者Linux网络相关的命令(比如route table)就可以比较轻松的写出flannel适配器。
整个适配过程可以分为下面4个步骤:
- 定义 TxVpcBackend struct, 实现New func 在init func中注册;
- 调用腾讯云SDK 实现 RegisterNetwork method;
- 最后在main.go中 注册腾讯云backend 即可;
- 部署deployment 的时候选择 tx-vpc 的backend 即可.
下面结合部分代码具体的说下实现过程:
定义结构体#
只是搭一个架子,方便注册到flannel backend上,不含具体适配器的逻辑:
 1
 2
 3
 4
 5
 6
 7
 8
 9
10
11
12
13
14
15
16
17
| type TxVpcBackend struct {
sm subnet.Manager
extIface *backend.ExternalInterface
}
func New(sm subnet.Manager, extIface *backend.ExternalInterface) (backend.Backend, error) {
be := TxVpcBackend{
sm: sm,
extIface: extIface,
}
return &be, nil
}
func init() {
backend.Register("tx-vpc", New)
}
|
实现RegisterNetwork#
 1
 2
 3
 4
 5
 6
 7
 8
 9
10
11
12
13
14
15
16
17
18
19
20
21
22
23
24
25
26
27
28
29
30
31
32
33
34
35
36
37
38
39
40
41
42
43
44
45
46
47
48
| func (be *TxVpcBackend) RegisterNetwork(ctx context.Context, config *subnet.Config) (backend.Network, error) {
// 1. Parse our configuration
cfg := struct {
AccessKeyID string
AccessKeySecret string
}{}
if len(config.Backend) > 0 {
if err := json.Unmarshal(config.Backend, &cfg); err != nil {
return nil, fmt.Errorf("error decoding VPC backend config: %v", err)
}
}
log.Infof("Unmarshal Configure : %v\n", cfg)
// 2. Acquire the lease form subnet manager
attrs := subnet.LeaseAttrs{
PublicIP: ip.FromIP(be.extIface.ExtAddr),
}
l, err := be.sm.AcquireLease(ctx, &attrs)
switch err {
case nil:
case context.Canceled, context.DeadlineExceeded:
return nil, err
default:
return nil, fmt.Errorf("failed to acquire lease: %v", err)
}
if cfg.AccessKeyID == "" || cfg.AccessKeySecret == "" {
cfg.AccessKeyID = os.Getenv("ACCESS_KEY_ID")
cfg.AccessKeySecret = os.Getenv("ACCESS_KEY_SECRET")
if cfg.AccessKeyID == "" || cfg.AccessKeySecret == "" {
return nil, fmt.Errorf("ACCESS_KEY_ID and ACCESS_KEY_SECRET must be provided! ")
}
}
err = createRoute(l.Subnet.String(), cfg.AccessKeyID, cfg.AccessKeySecret)
if err != nil {
log.Errorf("Error DescribeVRouters: %s .\n", err.Error())
}
return &backend.SimpleNetwork{
SubnetLease: l,
ExtIface: be.extIface,
}, nil
}
|
主要逻辑是 使用腾讯云的SDK 在vpc 网络下创建route , 即上面的
err = createRoute(l.Subnet.String(), cfg.AccessKeyID, cfg.AccessKeySecret
因为createRoute Func和 腾讯云sdk 的实现强相关,所以我就不展开了,个人可以去github上查看腾讯云的sdk文档。
targetRout#
最后targetRoute 应该是这个样子的:
1
2
3
4
5
6
| targetRoute := &vpc.Route{
DestinationCidrBlock: common.StringPtr(dest),
GatewayType: common.StringPtr("NORMAL_CVM"),
GatewayId: common.StringPtr(nextHop),
RouteDescription: common.StringPtr(desc + " flannel podCIDR"),
}
|
registry#
在main.go文件中加如import pkg即可注册腾讯云适配器:
1
| _ "github.com/coreos/flannel/backend/txvpc"
|
修改deploymnet#
修改官方的deployment yaml 文件中 net-conf.json字段,
把"Type": 改成tx-vpc即可:
1
2
3
4
5
6
| net-conf.json: |
{
"Network": "10.244.0.0/16",
"Backend": {
"Type": "tx-vpc"
}
|
新建RAM账户#
在腾讯云的dashboard新建 RAM 帐户,赋予vpc网络读写权限。
记下 AccessKeyID 和 AccessKeySecret;
修改deployment中填写deploy.yaml为上一步中记录的 AccessKeyID 和 AccessKeySecret值。
最后,用kubectl 部署flannle即可:
1
| kubectl create -f deploy.yaml
|
