flannel vpc

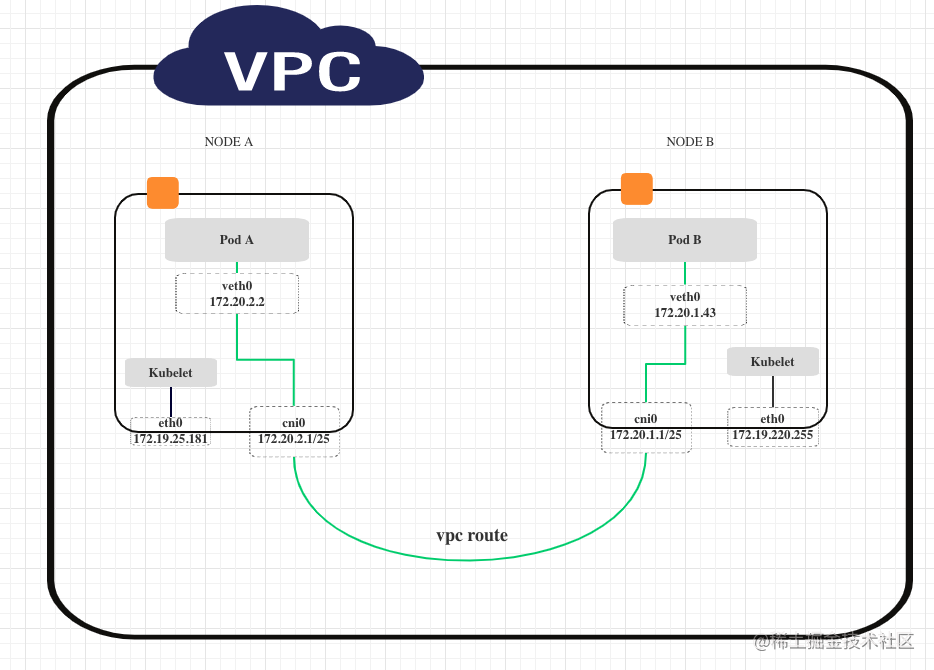
update: flannel从v0.14.0(2021/05/27)开始已经支持腾讯云的vpc backend了。 客户需要在腾讯云上部署kubernetes集群而且选用的网络插件是flannel,所以我们需要为flannel 添加 腾讯云 vpc 的 backend 适配。 我大致看了下github上 阿里云 和 aws 适配器的代码,发现并不复杂,flannel已经把所有的dirty work flannel 都包装好API了。 稍稍了解一些网络设备或者Linux网络相关的命令(比如route table)就可以比较轻松的写出flannel适配器。 整个适配过程可以分为下面4个步骤: 定义 TxVpcBackend struct, 实现New func 在init func中注册; 调用腾讯云SDK 实现 RegisterNetwork method; 最后在main.go中 注册腾讯云backend 即可; 部署deployment 的时候选择 tx-vpc 的backend 即可. 下面结合部分代码具体的说下实现过程: 开发 定义结构体 只是搭一个架子,方便注册到flannel backend上,不含具体适配器的逻辑: 1 2 3 4 5 6 7 8 9 10 11 12 13 14 15 16 17 type TxVpcBackend struct { sm subnet.Manager extIface *backend.ExternalInterface } func New(sm subnet.Manager, extIface *backend.ExternalInterface) (backend.Backend, error) { be := TxVpcBackend{ sm: sm, extIface: extIface, } return &be, nil } func init() { backend.Register("tx-vpc", New) } 实现RegisterNetwork 1 2 3 4 5 6 7 8 9 10 11 12 13 14 15 16 17 18 19 20 21 22 23 24 25 26 27 28 29 30 31 32 33 34 35 36 37 38 39 40 41 42 43 44 45 46 47 48 func (be *TxVpcBackend) RegisterNetwork(ctx context.Context, config *subnet.Config) (backend.Network, error) { // 1. Parse our configuration cfg := struct { AccessKeyID string AccessKeySecret string }{} if len(config.Backend) > 0 { if err := json.Unmarshal(config.Backend, &cfg); err != nil { return nil, fmt.Errorf("error decoding VPC backend config: %v", err) } } log.Infof("Unmarshal Configure : %v\n", cfg) // 2. Acquire the lease form subnet manager attrs := subnet.LeaseAttrs{ PublicIP: ip.FromIP(be.extIface.ExtAddr), } l, err := be.sm.AcquireLease(ctx, &attrs) switch err { case nil: case context.Canceled, context.DeadlineExceeded: return nil, err default: return nil, fmt.Errorf("failed to acquire lease: %v", err) } if cfg.AccessKeyID == "" || cfg.AccessKeySecret == "" { cfg.AccessKeyID = os.Getenv("ACCESS_KEY_ID") cfg.AccessKeySecret = os.Getenv("ACCESS_KEY_SECRET") if cfg.AccessKeyID == "" || cfg.AccessKeySecret == "" { return nil, fmt.Errorf("ACCESS_KEY_ID and ACCESS_KEY_SECRET must be provided! ") } } err = createRoute(l.Subnet.String(), cfg.AccessKeyID, cfg.AccessKeySecret) if err != nil { log.Errorf("Error DescribeVRouters: %s .\n", err.Error()) } return &backend.SimpleNetwork{ SubnetLease: l, ExtIface: be.extIface, }, nil } 主要逻辑是 使用腾讯云的SDK 在vpc 网络下创建route , 即上面的 ...

August 8, 2018 · datewu

Makefile简介

网络上关于 makefile的教程有很多,由于我日常不是写c/c++的, 不常使用makefile,需要用的时候总是要重新Google搜索makefile的语法。 索性整理出来这篇 makefile 教程,备忘。 教程 Makefile简易教程: 基本语法 1 2 3 4 target: dependency1 dependency2 ... [TAB] action1 [TAB] action2 ... 下面的makefile摘抄自GNU Make in Detail for Beginners,这篇入门文章把makefile的语法写的非常透彻。 推荐大家多读几遍 1 2 3 4 5 6 7 8 9 10 11 12 13 14 15 16 17 18 19 20 21 22 23 24 25 26 27 28 29 30 31 32 33 34 35 36 37 38 39 40 41 42 43 44 45 ##### makefile for compile C programs # Compiler to use CC = gcc # -g for debug, -O2 for optimise and -Wall additonal messages OPTIONS = -O2 -g -Wall # Directory for header file INCLUDES = -I . # List of objects to be build OBJS = main.o module.o .PHONY: all list clean all: ${OBJS} @echo "Building..." # print "Building..." message ${CC} ${OPTIONS} ${INCLUDES} ${OBJS} -o main_bin %.o: %.c # '%' pattern wildcard matching ${CC} ${OPTIONS} ${INCLUDES} -c %.c list: @echo $(shell ls) # print output of command `ls` clean: @echo Cleaning up... -rm -rf *.0 # '-' prefix for ignoring errors and continue execution -rm main_bin #### makefile for img manage FILES = $(shell find imgs -type f -iname "*.jpg" | sed 's/imgs/thumb/g') CONVERT_CMD = convert -resize "100x100" $< $@ MSG = "\nUpdating thumbnail" $@ all_thumb: ${FILES} thumb/%.jpg: imgs/%.jpg ${MSG} ${CONVERT_CMD} thumb/%.JPG: imgs/%.JPG ${MSG} ${CONVERT_CMD} clean_all: @echo Cleaning up files... -rm -rf thumb/*.{jpg,JPG} 变量 赋值 Simple assignment (:=) We can assign values (RHS) to variables (LHS) with this operator, for example: CC := gcc. With simple assignment (:=), the value is expanded and stored to all occurrences in the Makefile when its first definition is found. ...

July 27, 2018 · datewu

init优先级

假设一个golang项目的三个源文件a.go,b.go, c.go,都定义了function inint(){}函数, 其中c.go文件初始化了一个全局变量globalVar,同时a.go 或者b.go的init func 引用了这个全局变量globalVar。 那么这个时候就会出现一个问题,在a.go和 b.go的init func中 globalVar的引用是空值。 示例 文件结构 1 2 3 4 5 6 7 8 9 ❯ tree . ├── a.go ├── b.go ├── c.go ├── go.mod └── main.go 0 directories, 5 files 源代码 1 2 3 4 5 6 7 8 9 10 11 12 13 14 15 16 17 18 19 20 21 22 23 24 25 26 27 28 29 30 31 32 33 34 35 36 37 38 39 40 41 42 43 44 45 46 47 48 49 50 // file `a.go` package main import "fmt" func init() { // globalVar is empty fmt.Println("globalVar in a.go:", globalVar) } // file `b.go` package main import "fmt" func init() { // globalVar is empty fmt.Println("globalVar in b.go:", globalVar) } // file `c.go` package main import ( "fmt" "time" ) func init() { globalVar = initVar() fmt.Println("globalVar in c.go:", globalVar) } func initVar() string { time.Sleep(20 * time.Millisecond) return "late is better than never" } // file `main.go` package main import "fmt" var globalVar = "" func main() { fmt.Println("vim-go") } result 1 2 3 4 5 6 ❯ go build -o demo ❯ ./demo globalVar in a.go: globalVar in b.go: globalVar in c.go: late is better than never vim-go 解决办法 简单的解决办法可以是重命名c.go为0a.go保证0a.go中的init最早执行完成, ...

January 23, 2018 · datewu