TCP/IP教程

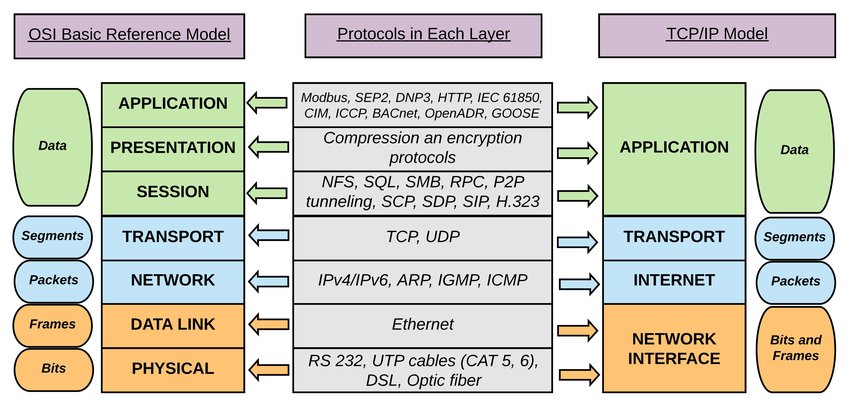
本文不定期更新 :) 上个礼拜逛Hacker News看到推荐了一份写于1991年介绍TCP/IP协议的文章A TCP/IP Tutorial。 初略的扫了几眼,发现不错,加入了收藏夹。 昨天晚上抽出时间来细读了一遍觉得很有翻译的价值,于是试着翻译一下: Introduction This tutorial contains only one view of the salient points of TCP/IP, and therefore it is the “bare bones” of TCP/IP technology. It omits the history of development and funding, the business case for its use, and its future as compared to ISO OSI. Indeed, a great deal of technical information is also omitted. What remains is a minimum of information that must be understood by the professional working in a TCP/IP environment. These professionals include the systems administrator, the systems programmer, and the network manager. ...

April 13, 2020 · datewu

Neutron小记

前段时间的花了很多功夫对接k8s和openstack的kuryr-kubernetes网路组件。 学到了很多openstack的知识,今天抽出时间来整理下。 client 首先是 install openstack-cli neutron client: 1 2 3 4 5 6 7 8 9 10 11 12 13 14 15 #!/bin/bash [root@deoops ~]# cat /etc/redhat-release Red Hat Enterprise Linux Server release 7.5 (Maipo) #### add openstack yum repo source [root@deoops ~]# vi /etc/yum.repos.d/openstack.repo [root@deoops ~]# yum install -y python2-openstackclient openstack-neutron [root@deoops shells]# cat source export OS_PROJECT_DOMAIN_NAME=default export OS_USER_DOMAIN_NAME=default export OS_PROJECT_NAME=your_project_name export OS_USERNAME=your_use_name export OS_PASSWORD=your_pwd export OS_AUTH_URL=http://10.8.1.3:35357/v3 export OS_IDENTITY_API_VERSION=3 export OS_IMAGE_API_VERSION=2 vip 我们来创建一个virtual IP验证上一步配置的openstack source对不对 : ...

April 21, 2019 · datewu

Macvlan路由规则

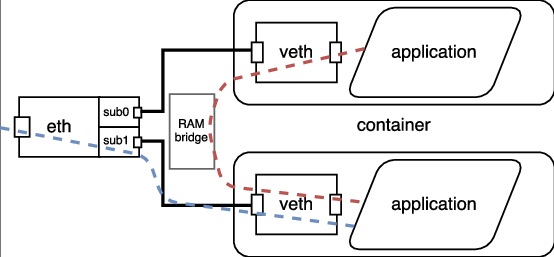
对macvlan 不熟悉的同学,可以先看下这篇macvlan virtual network简介 默认情况下Linux kernel会阻止(drop)宿主机(host eth0)虚拟出来的 macvlan network(bridge mode) 和宿主机host eth0)之间网络数据包。 调试了一段时间后,我们发现了可以通过路由表来绕过这个限制。 具体实施的方法如下: 在host network namesapces下新增 一个macvlan device,然后添加路由规则即可。 通信的两个方向简单解释如下: eth0(host) -> pod(macvlan) 宿主机host eth0 通过break0 设备 和route table的路由规则 可以访问到pod(在macvlan中) shell调试脚本如下: 1 2 3 4 5 6 ip link add break0 link eth0 type macvlan mode bridge # NOTE: if use /24 CIDR will auto add a route rule # (100.75.30.0/24 dev break0 proto kernel scope link src 100.75.30.1) # which we don't need ifconfig break0 100.75.30.7/32 up ip r a 100.75.30.71 dev break0 # 100.75.30.71 is a pod ip for test 因为kuryr是用python配置网络的,所以也提供对应的python脚本如下: ...

March 11, 2019 · datewu

无法创建macvlan设备

最近给客户调试 macvlan network时,遇到了Linux kernel 报错 SIOCSIFFKAGS: Device or resource busy. 无法创建网络device。 结果长时间的debug分析, 发现问题是高并发压测 创建和释放macvlan device的时候,设备的mac address出现了重复。 ps:这个问题只出现在 macvlannetwork 的设备中。 可以用下面的shell脚本来复现macvlan Device or resource busy的错误: 1 2 3 4 5 6 7 8 9 10 11 12 13 14 15 16 17 18 19 20 21 #!/bin/bash function setup { i=$1 ip l a m$i address 00:40:2F:4D:5E:6F link eth0 type macvlan mode bridge ip netns add ns$i ip l set m$i netns ns$i sleep 1 ip netns exec ns$i ifconfig m$i 10.0.0.$((i+1))/24 up echo $? } echo cleaning up ip -all netns d echo creating netsnses for i in `seq $1`; do echo $i.... #setup $i & setup $i done 如果把 macvlan 类型改为 dummy (上面脚本第5行 type macvlan 改为 type dummy) ,即使 MAC address 重复也不会引发kernel 报错。 ...

March 7, 2019 · datewu

VPC模式

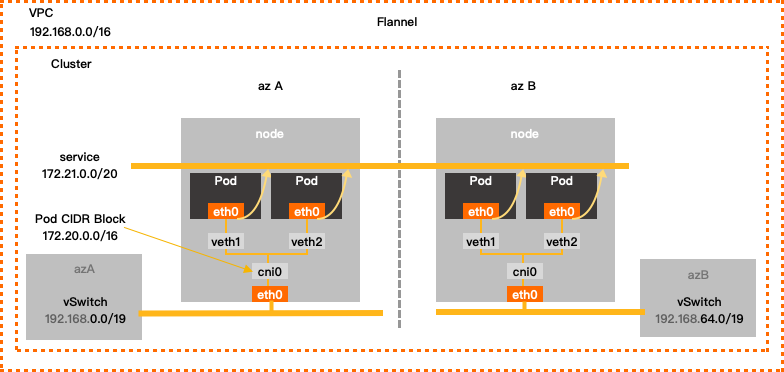
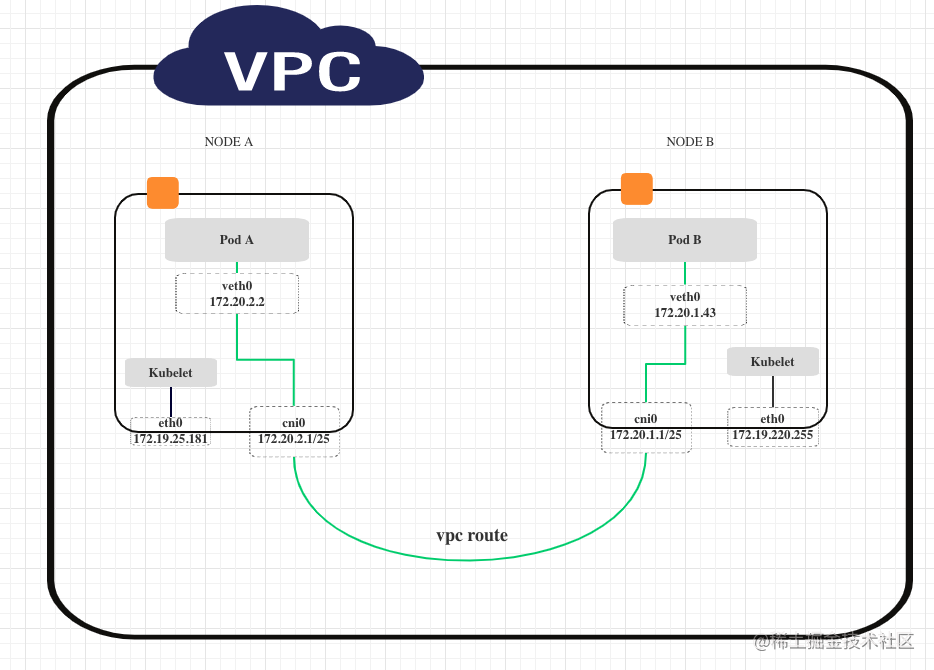
之前写了一篇post 适配腾讯云backend 的文章,从代码的角度简单记录了flannel vpc backend实现过程。 这篇文章是对前面文章的补充,全局鸟瞰描绘了flannel vpc backend网络数据包的流动过程。 总体来看vpc 和 host-gw 模式是很类似的,理解host-gateway模式 对理解vpc 模式很有帮助。 host gw host gateway 模式: host-gw adds route table entries on hosts, so that host know how to traffic container network packets. This works on L2, because it only concerns hosts, switches and containers. switches does not care IP and route, hosts know containers exists, and how to route to them, containers just send and receive data. ...

September 11, 2018 · datewu

flannel vpc

update: flannel从v0.14.0(2021/05/27)开始已经支持腾讯云的vpc backend了。 客户需要在腾讯云上部署kubernetes集群而且选用的网络插件是flannel,所以我们需要为flannel 添加 腾讯云 vpc 的 backend 适配。 我大致看了下github上 阿里云 和 aws 适配器的代码,发现并不复杂,flannel已经把所有的dirty work flannel 都包装好API了。 稍稍了解一些网络设备或者Linux网络相关的命令(比如route table)就可以比较轻松的写出flannel适配器。 整个适配过程可以分为下面4个步骤: 定义 TxVpcBackend struct, 实现New func 在init func中注册; 调用腾讯云SDK 实现 RegisterNetwork method; 最后在main.go中 注册腾讯云backend 即可; 部署deployment 的时候选择 tx-vpc 的backend 即可. 下面结合部分代码具体的说下实现过程: 开发 定义结构体 只是搭一个架子,方便注册到flannel backend上,不含具体适配器的逻辑: 1 2 3 4 5 6 7 8 9 10 11 12 13 14 15 16 17 type TxVpcBackend struct { sm subnet.Manager extIface *backend.ExternalInterface } func New(sm subnet.Manager, extIface *backend.ExternalInterface) (backend.Backend, error) { be := TxVpcBackend{ sm: sm, extIface: extIface, } return &be, nil } func init() { backend.Register("tx-vpc", New) } 实现RegisterNetwork 1 2 3 4 5 6 7 8 9 10 11 12 13 14 15 16 17 18 19 20 21 22 23 24 25 26 27 28 29 30 31 32 33 34 35 36 37 38 39 40 41 42 43 44 45 46 47 48 func (be *TxVpcBackend) RegisterNetwork(ctx context.Context, config *subnet.Config) (backend.Network, error) { // 1. Parse our configuration cfg := struct { AccessKeyID string AccessKeySecret string }{} if len(config.Backend) > 0 { if err := json.Unmarshal(config.Backend, &cfg); err != nil { return nil, fmt.Errorf("error decoding VPC backend config: %v", err) } } log.Infof("Unmarshal Configure : %v\n", cfg) // 2. Acquire the lease form subnet manager attrs := subnet.LeaseAttrs{ PublicIP: ip.FromIP(be.extIface.ExtAddr), } l, err := be.sm.AcquireLease(ctx, &attrs) switch err { case nil: case context.Canceled, context.DeadlineExceeded: return nil, err default: return nil, fmt.Errorf("failed to acquire lease: %v", err) } if cfg.AccessKeyID == "" || cfg.AccessKeySecret == "" { cfg.AccessKeyID = os.Getenv("ACCESS_KEY_ID") cfg.AccessKeySecret = os.Getenv("ACCESS_KEY_SECRET") if cfg.AccessKeyID == "" || cfg.AccessKeySecret == "" { return nil, fmt.Errorf("ACCESS_KEY_ID and ACCESS_KEY_SECRET must be provided! ") } } err = createRoute(l.Subnet.String(), cfg.AccessKeyID, cfg.AccessKeySecret) if err != nil { log.Errorf("Error DescribeVRouters: %s .\n", err.Error()) } return &backend.SimpleNetwork{ SubnetLease: l, ExtIface: be.extIface, }, nil } 主要逻辑是 使用腾讯云的SDK 在vpc 网络下创建route , 即上面的 ...
August 8, 2018 · datewu

安装配置openvpn

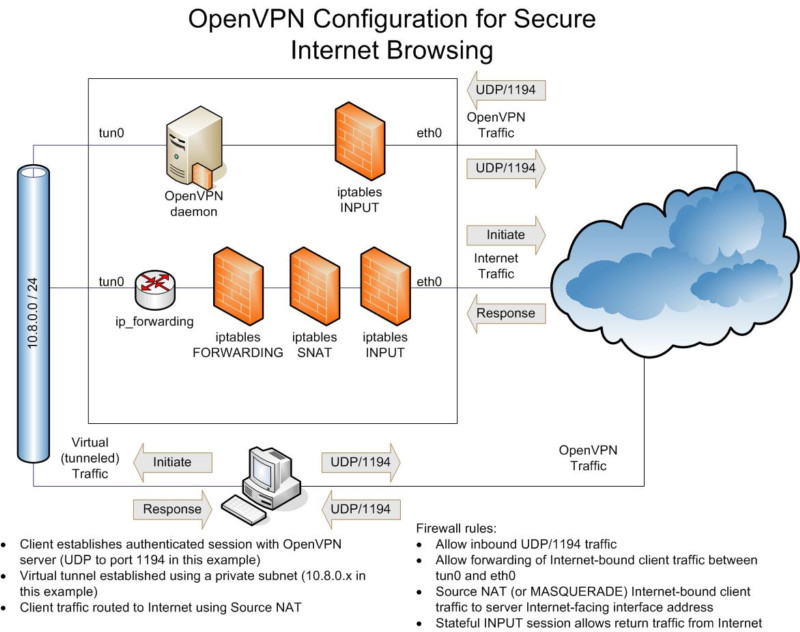
开发需要能调用facebook的接口,我们运维这边需要配置一台测试服务器能访问facebook,用shadowsocks 和squid 代理,性能不够好。所以决定上openvpn。 简单记录下openVPN的安装配置过程,服务端和客户端使用的操作系统均是centos 7。 服务端 安装 1 2 3 #!/bin/bash yum install epel-release -y yum install openvpn openssl -y 自签名证书 使用openssl工具生产自签名的ca,证书,client.key,并把这些证书传给客户端: 1 2 3 4 5 6 7 8 9 10 11 12 13 14 15 16 17 18 19 20 21 22 23 24 25 26 #!/bin/bash ### CA openssl dhparam -out /etc/openvpn/dh.pem 2048 openssl genrsa -out /etc/openvpn/ca.key 2048 openssl req -new -key /etc/openvpn/ca.key -out /etc/openvpn/ca.csr -subj /CN=OpenVPN-CA/ openssl x509 -req -in /etc/openvpn/ca.csr -out /etc/openvpn/ca.crt -signkey /etc/openvpn/ca.key -days 3650 echo 01 > /etc/openvpn/ca.srl chmod 600 /etc/openvpn/ca.key ### Server openssl genrsa -out /etc/openvpn/server.key 2048 openssl req -new -key /etc/openvpn/server.key -out /etc/openvpn/server.csr -subj /CN=OpenVPN/ openssl x509 -req -in /etc/openvpn/server.csr -out /etc/openvpn/server.crt -CA /etc/openvpn/ca.crt -CAkey /etc/openvpn/ca.key -days 3650 chmod 600 /etc/openvpn/server.key ### Client openssl genrsa -out /etc/openvpn/client.key 2048 openssl req -new -key /etc/openvpn/client.key -out /etc/openvpn/client.csr -subj /CN=OpenVPN-Client/ openssl x509 -req -in /etc/openvpn/client.csr -out /etc/openvpn/client.crt -CA /etc/openvpn/ca.crt -CAkey /etc/openvpn/ca.key -days 3650 chmod 600 /etc/openvpn/client.key ### 把clinet的证书私钥和ca正式传给客户端 scp /etc/openvpn/ca.crt /etc/openvpn/client.crt /etc/openvpn/client.key client: 配置 服务端配置文件: 1 2 3 4 5 6 7 8 9 10 11 12 13 14 15 16 17 18 19 20 21 22 # /etc/openvpn/server.conf server 10.8.0.0 255.255.255.0 verb 3 key /etc/openvpn/server.key ca /etc/openvpn/ca.crt cert /etc/openvpn/server.crt dh /etc/openvpn/dh.pem keepalive 10 120 persist-key persist-tun comp-lzo push "redirect-gateway def1 bypass-dhcp" push "dhcp-option DNS 8.8.8.8" push "dhcp-option DNS 8.8.4.4" user nobody group nogroup proto udp port 1194 dev tun1194 status openvpn-status.log kernel iptables 打开服务器路由配置: ...

February 20, 2017 · datewu